
Documentation
This page explains the use of NTS: the restrictions that NTS imposes for its use, converting a PVM program to NTS (which is the easiest way of making an NTS program), setting up a network and running the application on the simulated network. This chapter also explains all the NTS options, and logging facilities for analysis of the effect of the simulated network on the parallel algorithm.
Installing
Getting NTS
NTS is available for download from the VUB Parallel Computing Lab at http://parallel.vub.ac.be
NTS is designed for Linux, but should be easy to convert to Windows as it uses the Qt toolkit as a base. The rest of this chapter refers to Linux.
Installing
- Uncompress the archive to the directory in which you wish to install NTS
- Edit the “ntsexecfiles.h” file located in the main directory, and comment/uncomment the form of execution used by your system
- Set a new environemnt variable: "nts_ROOT" to the
directory where NTS is located, ie dir where this README is in. You will have to edit your profile file:
if your shell is csh add to your .cshrc file
setenv nts_ROOT $HOME/nts
if your shell is sh, ksh, or bash add to your .profile file
nts_ROOT = $HOME/nts
export nts_ROOT
and rerun your profile
The environement variable will be used to set links from the bin directory to the PVM executable directory - Run the “install” script
Notes
- The ntsMaster will be compiled into the “nts/bin” directory,
- The communication library will be compiled to the “nts/lib” directory,
- The ntsRouter program will be compiled into the “$(PVM_ROOT)/bin/$(PVM_ARCH)” directory,
- The example ntsExample program will be compiled into the “$(PVM_ROOT)/bin$(PVM_ARCH)” directory,
- The antGraph library (also included in the distribution) will be compiled into the “nts/lib” directory.
To change one of these settings, edit the project file in the relevant sub-directory of NTS.
Requirements
The following libraries are required to use/compile NTS:
- PVM3 and PVM3 dev
- Make
- Qt 3 and Qt 3 dev
- Qt Designer 3.2
Converting a PVM Application
Making an application for NTS is very simple if you know PVM.
To show how simple it is, the steps to convert an existing
PVM application into a NTS one are listed:
- Include “<nts.h>” as well as “<pvm3.h>”
- Change the function call of every PVM function to its NTS equivalent (the easiest way is to do a search and replace supported by most editors, search for “pvm_” and replace by “nts_”, this will convert all functions to NTS automatically)
- In the project or make file, add the reference to the NTS library “-lnts” located in the “nts/lib” directory where NTS was installed
- The include files for NTS are found in the “nts/include” directory
- Make sure both PVM libraries: “-lpvm3” and “-lgpvm3” are referenced
- Compile
Note: These are the steps to take to convert PVM application, which is compatible with the restrictions, imposed by NTS, make sure to check the restrictions for every program.
Restrictions
of Use
NTS – Network Topology Simulator, being a build on PVM,
must share the limited resources provided by PVM for communications
with the Client. This
leads to compression of data, and certain data loses.
This imparts limitations on the design of programs that NTS
can run on the simulated network.
Follows a comprehensive list of all the limitations a
programmer has to take into account to run a program under NTS:
- Message
Tags permitted are from 0 – 99,
- Only
999 Clients are allowed to connect in any one session of NTS,
this count is still valid even if a Client has been removed from
the network, a 1000th Client will just not connect,
restart NTS to add more,
- NO
“-1” or listening to any message is permitted, either in TID,
or message tag,
- Some
overloaded functions may point out that some advanced
functionalities are not supported by NTS, the request will be
forwarded on to its PVM equivalent, but no guarantee of the
effects on the stability of the network can be given,
- Caution should be taken when connecting to NTS the first time, as a connection delay may occur.
Running NTS Simulation
To run an application under a NTS simulated network, one must first create a NTS network and put it into “running” mode.
Start PVM, the “pvm” console program is located in “$(PVM_ROOT)/console/$(PVM_ARCH)”. Add all the computers you wish to participate in the simulation via the “add” command of the console.
Start “ntsMaster” program located in “nts/bin”. Build a network topology using the ntsMaster GUI, add Routers, set Links etc. Set all options for Routers. “Build” the simulation network by pressing the “run” button.
Start the NTS application normally.
ntsMaster
The ntsMaster is the configuration program of NTS. It is used to build, and modify a NTS simulated network. This section will describe how to use the NTS Master and all of its options to run and configure a NTS network. NTS Master sports multiple select points for any NTS component.
The Main Window
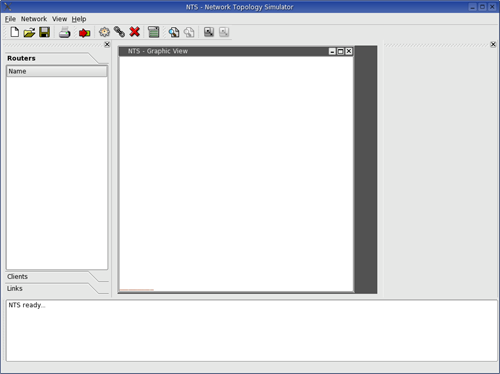
Upon starting ntsMaster you are presented with the main window (Figure 18). The window compromises a main workspace (Figure 21) with only the Graphic View initially visible, menus, toolbars, and side views. All views can be shown or hidden via the View Menu. Side Views can be docked, moved, detached or hidden for user preference.
Network Building
Network building functions can be accessed via the Network Toolbar (Figure 19), the Network Menu, or via their keyboard shortcuts.
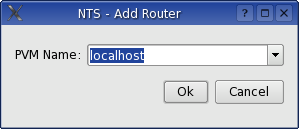
- Add Router (CTRL + A): shows the Add Router Popup (Figure 20) where the user can chose or type in the name of the computer of on which a Router will be created
- Add Link (CTRL + L): adds a link in between two Routers, two Routers have got to be selected, if a Router was selected when this function is called, just select another Router, if no Router is selected, select a Router followed by another, if the Graphic View is used for the selection, the user can drag to select the two Routers, a line will appear to show the selection, adding the inverse link on top of a directional link will turn it into a bi-directional link
- Delete (DELETE): deletes the currently selected component
- Run/Stop (CTRL + R): button to instantiate the network and bring it into “running” mode so that Clients can connect to the simulated network
- Print Router Table (CTRL + P): when in “running” mode and a Router is selected, sends a message to the Router to print the contents of its Routing Table
Main Graphic View
This view shows the network being built graphically. Circles represent Routers (the Router name is printed under). Rectangles represent Clients connected to the network when in “running” mode. Lines connecting Routers or Clients represent links. Having a circle at the one of the ends of the line representing it identifies a directional link and the direction in which it is.
The Graphical Area can be zoomed in and out. It can be enlarged to accommodate a larger network. All network components represented can be selected by clicking on it. Graphical representations of Routers can be dragged around the Graphical Area for better arrangement.
The Graphical View can be printed out to the printer using the File Menu or the appropriate toolbar button.
NTS Log Display
Displays a running log of all the functions executed, and running messages of the NTS network.
Lists View
The Lists View presents the contents of the NTS simulated network in alphabetically ordered lists. The lists are grouped by category of component: Routers, Clients, Links, Messages, and Paths. Any item in the lists clicked will select the item.
Properties View
Displays more information about the currently selected component of the ntsNetwork. Each component type has its own set of properties, some of which can be edited via this View.
- Router: a router’s display name can be changed for easier recognition within the network, the properties of the router are displayed as well as a lists of connected neighbors and clients,
- Links: the from and to nodes are listed, you can change whether the link is bi-directional or not, and invert the direction of the link (Note: Client Links are always bi-directional and cannot be inverted),
- Clients: display their TID and their local router,
- Message: display the information about a logged forwarded message,
- Path: display the path taken through the simulated network for a message sent by a client, the time taken is calculated.
Log View
The Log View is a convenience tool used to open a file text file in the ntsMaster interface. The opened file will keep streaming in the View if it is edited. Its intended purpose is to open the PVM log file, but the Log View can be used to open any text file. The first time the Log View is shown, it will automatically open a dialog to choose a file to open. A new file can be open using the Log View option under the View Menu.
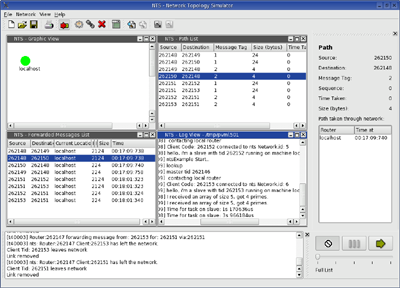
Message Log
The Message Log displays all the messages the routers are forwarding for Clients. Message Forwarding has got to be enabled for messages to be logged; this option can be edited via the Network Menu. The Message Log displays information about the forwarded message such as: its source and destination, its current location, the time at the location, etc. The Log can be ordered via any of the columns.
Path View
The Path View lists the messages sent through the ntsNetwork. Message Forwarding has got to be enabled for Paths to be logged. Unlike the Message Log, which shows every message forwarded by every Router, the Path View shows each message sent by a Client as a Path through the network. By selecting a Path the full details of the message being forwarded through the message can be seen, the actual Router to Router hops, the time taken to go through the network, etc.
Time Matrix
The time matrix calculates average time taken for a message to be forwarded from one Router to another based on the data collected by the Paths.
Player
The Player graphically displays a selected Path on the Graphic View. The Message will be seen being forwarded from Router to Router. The speed of play can be chosen. If no Path is selected, the Player will play the full path or the full list of forwarded messages. The full list playing will display all the messages being forwarded based on the time of action of each Message.
Save/Load
NTS network topologies can be saved in “*.net” text files. These files will save the current routers (names associated with them if any), and any links linking them. The current graphical display location of the Routers will also be saved.
For loading a file, the user must make sure the all the computers saved in the file are added as nodes to PVM before loading the file. Any computer not found in PVM will be skipped while loading. If any Router is skipped, any Links concerning that Router will not be loaded as well.
Auto Building
ntsMaster provides four auto building functions via the Network Menu. The first one can be used to add all the PVM names present in the PVM console into the NTS network. The next two options add all the Routers from PVM console also, but link all the Routers together in a circular pattern alphabetically. The links connecting the Routers can be unidirectional or bi-directional depending on the option chosen. The last auto building function constructs a star network, taking the first alphabetical Router name as the center of the star. All links in this build are of course bi-directional.
Setting Routers to Silent
ntsRouters can be set to working “silently”, i.e. they won’t print out any messages as they work via the option in the Network Menu.
Message Forwarding Logging
This option sets whether the NTS network logs the messages that are forwarded by Routers. Turning this option on means the Message View, Path View, and Time Matrix will be operational but the logging is resource hungry on the network and may cause some extra lags. The default option is that Message Forwarding Logging is on.
All Bi-Directional
This options sets whether newly created links are automatically bi-directional. When toggled, it converts all links present on the network to the chosen setting. This option can be set via the Network Menu
Known Bugs
PVM_Config
PVM does not seem to sit well with multiple threads using the PVM library at the same time. Once the NTS network is up and running, while adding a new Router, the pvm_config() function may not work and the dropdown list of available PVM computers may not appear in the popup. You can still input the PVM computer name manually.