Modula-2
Compiler
XDS

Manual
start - files - libraries - the history - the debugger - projects
- tips
Problems? Troubleshooting page!
Start programming
Create a new file: 
Save the file as modulename.mod
The name MUST be the exact same name as the module
name!
The extension .mod is necessary! (You must type it yourself
in the Save File dialog box!!)
Don't use spaces in the file name or even in the directory
name, XDS has problems with spaces!
Probably the Run button  is
desactivated and looks like this:
is
desactivated and looks like this:  . This is a bug in XDS, you should close the file and reopen it (Hint:
use the Recent File list at the bottom of the File menu).
. This is a bug in XDS, you should close the file and reopen it (Hint:
use the Recent File list at the bottom of the File menu).
Open an existing file: 
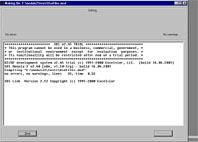
Run the program:
- Your program will be compiled and linked, you get the
compile/link window:
- If your program contains errors, you'll see them in the message
window:
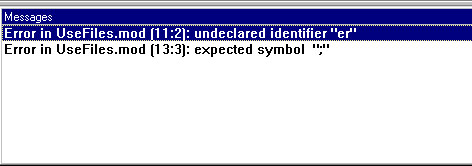
- Correct the errors and try to run the program again.
- If your program is correct it will run. Input and output of the
program you get in the black Console Window:
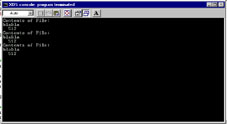
- When your program is finished, you get the message program
terminated at the top line of the console window. Then you can
return to XDS, without closing the console window.
Modula-2 files

Modula-2 programming uses several file types:
| file type |
created by... |
meaning |
| .mod = source file |
programmer |
code |
| .obj = object file |
XDS compiler |
compiled code, checked for syntax errors |
| .exe = executable |
XDS linker |
ready-to-run program |
| .bak = backup file |
XDS |
XDS backup of .mod & .def file, not important |
| .def = definition file |
programmer |
definitions of library |
| .sym = symbol file |
XDS compiler |
compiled definition file, checked for syntax errors |
| tmp file |
XDS compiler |
not important |
| errinfo.$$$ |
executable, at runtime |
when program crashes, this file keeps the history information
of the procedure call stack (see history doc below) |
So if you want to transport your code, you only need your mod & def
files.
Check the next section for a better understanding of the relations
between all these files.
 Libraries
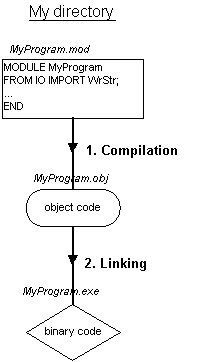
Compilation of a simple program consists of two steps. First, the
compilation checks the code for syntax errors and transforms it into
object code. Second, the executable is generated by the linker.
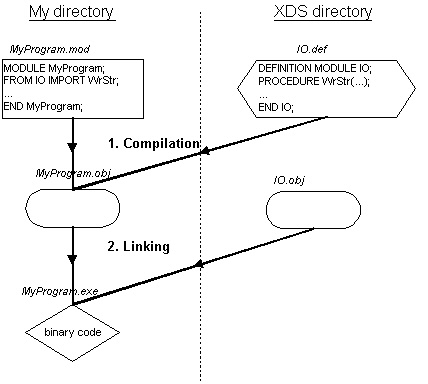
By using Modula-2 libraries, the compiler checks library usage with
the definitions of the library definition-file. The linking will group
the program object code with the library objects. All library
definition file can be found in the /def subdirectory of the XDS
directory.
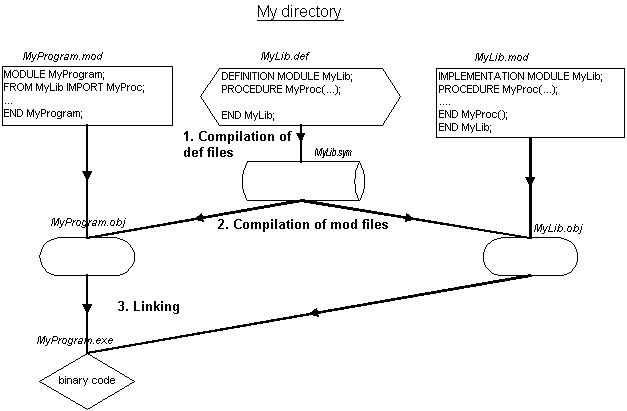
For creation of your own library, you'll have to create a Definition
Module (.def file) and an Implementation Module (.mod file) (see Modula-2 reference for
experts for correct syntax). Leave them in the same directory as
your main module. Run your program from the main module (select the
module and push the run button).
Now, compilation will first check the definition files for errors and
transform them into .sym files. These symbol files are then used for
compilation of the .mod files into object files which are grouped
together during the final linking phase.
Note that files are only recompiled when they are changed, or when
files are changed that are used by them.
Tip: to test a library module for program errors, compile it
with the compile button:  .
.
The history
If you want to know on which line your code crashes, you can
use the history or the debugger!
- After your program crashed, select under the Tools menu
=> History
- Close the History dialog
- In the message window you see something like this:
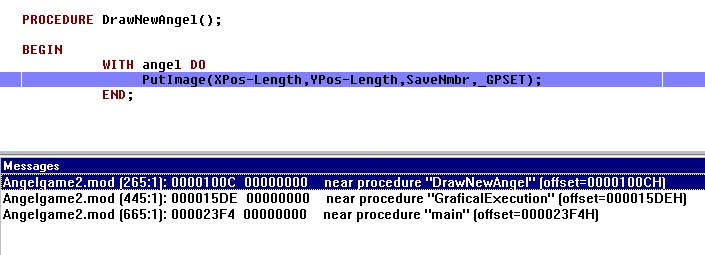
- This is the "procedure call stack", the list of all
consecutive procedure calls:
- here, the main program (after the BEGIN) calls
procedure GraficalExecution, which calls DrawNewAngel,
when
the
program
crashed
- by clicking on the procedure, you see the line of the crash,
here Length is greater than XPos, generating a
negative cardinal and an whole overflow error
The Debugger
If you want better understanding in your program, you can use the
debugger. It is very handy and is a must for a good programmer!
Here is how you use it:
First, add <* NOOPTIMIZE + *> at the second
line of
your code (after MODULE) to prevent the compiler for
optimising your
code, because then you won't see all your code
View your program step-by-step:
Gebruik van de Debugger voor Dummies
|
In English...
|
- Start je
programma in de debugger met
 in
plaats van . in
plaats van .
- Zet uw cursor op 1 van de eerste groene lijnen van je
programma (dus na BEGIN).
- Druk F4 (run to cursor):
je
programma
start en stopt tot op de lijn waar je cursor staat.
- Beneden zie je de waarden van de variabelen, op de arrays
en records kan je klikken om de waarden te bekijken.
- Druk F7 om de code stap-voor-stap uit te voeren.
- Druk ctrl-F7 (step over)
als
je
op een lijn staat met een procedure maar niet in die procedure
wilt gaan.
- Met Ctrl-x herstart je je programma.
|
- Instead of
running your program with the RUN button , you press
the RUN DEBUGGER button .
- Put your cursor on a green line
- Press F4 (run to cursor): your program starts and stops at
the
line of the cursor
- Press F7 continuously to execute the code step-by-step, at
the
bottom you see the values of all variables
- Press ctrl-F7 (step over) if you are on a line with a
procedure and you don't want to go inside the procedure
- Ctrl-x to restart your program
|
More advanced use
of the debugger:
- Start with the RUN DEBUGGER button .
- Your program will then be compiled as always, then you get an
extra black window called "XDS Debugger for Win32" with a menu with
items
FILE-RUN-BREAKS-CODE-...
- Press F5 (or choose menu RUN-> RUN) to start your program.
Your program will run as always. You can interact with it, etc.
- In the debugger you can find the following information:
- in the section 'Locals' (down left) you find the values of
your local variables.
- in the section 'Globals' (down middle) you find the values of
your global variables.
- you can see the 'Call Stack' if you choose menu item CODE and
then Call Stack.
- What's the call stack? In your program you use procedures,
eg procedure A calls procedure B, which calls procedure C, etcetera.
This is the called the Call Stack.
- When it crashes, the debugger will give you a message
and stops at the line of the crash (most of the times...)!
- Eg: an invalid index mistake when you tried to access
an index out of the bounds of the array, it will stop on that line and
you can see the value of the index.
- Run step-by-step:
- Press F7 continuously to execute the code step-by-step, at
the
bottom you see the values of all variables
- Press ctrl-F7 (step over) if you are on a line with a
procedure and you don't want to go inside the procedure
- Add breakpoints if you want your program to stop at a
certain place in your code
- add a breakpoint by clicking at the left of the line, you get
a yellow circle
- goto a certain line in your file with ctrl-G
- choose a different file or procedure in the menu Code
- run with F5 to the first breakpoint
- program stops at breakpoint, continue step-by-step with F7 or
F5
- Quit the debugger with ALT-X (or menu item FILE-> EXIT)
Projects
Projects can be handy to set options, keep track of all files
etcetera, but using a project IS NOT REALLY NECESSARY! It
creates a lot of extra files, so we will not use it during the course.
Tips for using XDS
- Gebruik Find (ctrl+F) om iets te vinden en de Find Next (ctrl+L)
om
de
volgende
te vinden
- Als je in je code op een variabele/procedure/constante staat,
kan
je via de rechtermuis een Search Up/ Search Down doen naar die
naam!!
- Gebruik de Replace (ctrl-H) om 1 or meerdere woorden te
vervangen! Zet de opties goed.
- Om in te springen (voor de indentatie):
- Je kan de lengte van Tab instellen (bvb op 2): Configure
=> Editor => Tab Size.
- Om meerdere lijnen tegelijk te verzetten: selecteer de lijnen,
hou ALt+Shift ingedrukt en gebruik dan de pijltjes-toetsen!
- Als je code lang wordt is het handig om bookmarks te zetten:
- zet een bookmark met ctrl+shift+nummer van 1 tot 9 (of
via rechtermuisklik)
- je ziet het bookmark dan links in de marge staan.
- je kan dan gemakkelijk maar het bookmark toe springen met ctrl+nummer
- Gebruik de Home en End knop om naar het begin of
einde van een lijn te springen