
[ Seminars ] [ Seminars on CD ROM ] [ Consulting ]
The programmer had to know many details
about the network and sometimes even the hardware. You usually needed to
understand the various “layers” of the networking protocol, and
there were a lot of different functions in each different networking library
concerned with connecting, packing, and unpacking blocks of information;
shipping those blocks back and forth; and handshaking. It was a daunting task.
[ Add Comment ]
However, the basic idea of distributed
computing is not so difficult, and is abstracted very nicely in the Java
libraries. You want to:
Each
topic will be given a light introduction in this chapter. Please note that each
subject is voluminous and by itself the subject of entire books, so this chapter
is only meant to familiarize you with the topics, not make you an expert
(however, you can go a long way with the information presented here on network
programming, servlets and JSPs).
[ Add Comment ]
One of Java’s great strengths is
painless networking. The Java network library designers have made it quite
similar to reading and writing files, except that the “file” exists
on a remote machine and the remote machine can decide exactly what it wants to
do about the information you’re requesting or sending. As much as
possible, the underlying details of networking have been abstracted away and
taken care of within the JVM and local machine installation of Java. The
programming model you use is that of a file; in fact, you actually wrap the
network connection (a “socket”) with stream objects, so you end up
using the same method calls as you do with all other streams. In addition,
Java’s built-in multithreading is exceptionally handy when dealing with
another networking issue: handling multiple connections at once.
[ Add Comment ]
This section introduces Java’s
networking support using easy-to-understand examples.
[ Add Comment ]
Of course, in order to tell one machine
from another and to make sure that you are connected with a particular machine,
there must be some way of uniquely identifying machines
on a network. Early networks were satisfied to provide unique names for machines
within the local network. However, Java works within the Internet, which
requires a way to uniquely identify a machine from all the others in the
world. This is accomplished with the
IP
(Internet Protocol) address which can exist in two
forms“:
[ Add Comment ]
In both
cases, the IP address is represented internally as a 32-bit
number[72] (so each
of the quad numbers cannot exceed 255), and you can get a special Java object to
represent this number from either of the forms above by using the static
InetAddress.getByName( ) method that’s in java.net. The
result is an object of type InetAddress that you can use to build a
“socket,” as you will see later.
[ Add Comment ]
As a simple example of using
InetAddress.getByName( ), consider what happens if you have a
dial-up Internet service provider (ISP). Each time you dial up, you are assigned
a temporary IP address. But while you’re connected, your IP address has
the same validity as any other IP address on the Internet. If someone connects
to your machine using your IP address then they can connect to a Web server or
FTP server that you have running on your machine. Of course, they need to know
your IP address, and since a new one is assigned each time you dial up, how can
you find out what it is?
[ Add Comment ]
The following program uses
InetAddress.getByName( ) to produce your IP address. To use it, you
must know the name of your computer. On Windows 95/98, go to
“Settings,” “Control Panel,” “Network,” and
then select the “Identification” tab. “Computer name” is
the name to put on the command line.
//: c15:WhoAmI.java
// Finds out your network address when
// you're connected to the Internet.
import java.net.*;

public class WhoAmI {
  public static void main(String[] args)
      throws Exception {
    if(args.length != 1) {
      System.err.println(
        "Usage: WhoAmI MachineName");
      System.exit(1);
    }
    InetAddress a =
      InetAddress.getByName(args[0]);
    System.out.println(a);
  }
} ///:~
In this case, the machine is called
“peppy.” So, once I’ve connected to my ISP I run the
program:
java WhoAmI peppy
I get back a message like this (of
course, the address is different each time):
peppy/199.190.87.75
If I tell my friend this address and I
have a Web server running on my computer, he can connect to it by going to the
URL http://199.190.87.75 (only as long as I continue to stay connected
during that session). This can sometimes be a handy way to distribute
information to someone else, or to test out a Web site configuration before
posting it to a “real” server.
[ Add Comment ]
The whole point of a network is to allow
two machines to connect and talk to each other. Once the two machines have found
each other they can have a nice, two-way conversation. But how do they find each
other? It’s like getting lost in an amusement park: one machine has to
stay in one place and listen while the other machine says, “Hey, where are
you?”
[ Add Comment ]
The machine that “stays in one
place” is called the
server, and the one that
seeks is called the
client. This distinction
is important only while the client is trying to connect to the server. Once
they’ve connected, it becomes a two-way communication process and it
doesn’t matter anymore that one happened to take the role of server and
the other happened to take the role of the client.
[ Add Comment ]
So the job of the server is to listen for
a connection, and that’s performed by the special server object that you
create. The job of the client is to try to make a connection to a server, and
this is performed by the special client object you create. Once the connection
is made, you’ll see that at both server and client ends, the connection is
magically turned into an I/O stream object, and from then on you can treat the
connection as if you were reading from and writing to a file. Thus, after the
connection is made you will just use the familiar I/O commands from Chapter 11.
This is one of the nice features of Java networking.
[ Add Comment ]
For many reasons, you might not have a
client machine, a server machine, and a network available to test your programs.
You might be performing exercises in a classroom situation, or you could be
writing programs that aren’t yet stable enough to put onto the network.
The creators of the Internet Protocol were aware of this issue, and they created
a special address called
localhost to be the
“local loopback” IP
address for testing without a network. The generic way to produce this address
in Java is:
InetAddress addr = InetAddress.getByName(null);
If you hand getByName( ) a
null, it defaults to using the localhost. The InetAddress
is what you use to refer to the particular machine, and you must produce this
before you can go any further. You can’t manipulate the contents of an
InetAddress (but you can print them out, as you’ll see in the next
example). The only way you can create an InetAddress is through one of
that class’s overloaded static member methods
getByName( ) (which is what you’ll usually use),
getAllByName( ), or getLocalHost( ).
[ Add Comment ]
You can also produce the local loopback
address by handing it the string localhost:
InetAddress.getByName("localhost");(assuming “localhost” is
configured in your machine’s “hosts” table), or by using its
dotted quad form to name the reserved IP number for the
loopback:
InetAddress.getByName("127.0.0.1");All three forms produce the same result.
[ Add Comment ]
An IP address isn’t enough to
identify a unique server, since many servers can exist on one machine. Each IP
machine also contains ports, and when you’re setting up a client or
a server you must choose a port
where both client and server agree to connect; if you’re meeting someone,
the IP address is the neighborhood and the port is the bar.
[ Add Comment ]
The port is not a physical location in a
machine, but a software abstraction (mainly for bookkeeping purposes). The
client program knows how to connect to the machine via its IP address, but how
does it connect to a desired service (potentially one of many on that machine)?
That’s where the port numbers come in as a second level of addressing. The
idea is that if you ask for a particular port, you’re requesting the
service that’s associated with the port number. The time of day is a
simple example of a service. Typically, each service is associated with a unique
port number on a given server machine. It’s up to the client to know ahead
of time which port number the desired service is running on.
[ Add Comment ]
The system services reserve the use of
ports 1 through 1024, so you shouldn’t use those or any other port that
you know to be in use. The first choice for examples in this book will be port
8080 (in memory of the venerable old 8-bit Intel 8080 chip in my first computer,
a CP/M machine).
[ Add Comment ]
The socket is the software
abstraction used to represent the “terminals” of a connection
between two machines. For a given connection, there’s a socket on each
machine, and you can imagine a hypothetical “cable” running between
the two machines with each end of the “cable” plugged into a socket.
Of course, the physical hardware and cabling between machines is completely
unknown. The whole point of the abstraction is that we don’t have to know
more than is necessary.
[ Add Comment ]
In Java, you create a socket to make the
connection to the other machine, then you get an InputStream and
OutputStream (or, with the appropriate converters, Reader and
Writer) from the socket in order to be able to treat the
connection as an I/O stream object. There are two stream-based socket classes: a
ServerSocket that a server uses to “listen” for incoming
connections and a Socket that a client uses in order to initiate a
connection. Once a client makes a socket connection, the ServerSocket
returns (via the accept( )
method) a corresponding
Socket through which communications will take place on the server side.
From then on, you have a true Socket to Socket connection and you
treat both ends the same way because they are the same. At this point,
you use the methods
getInputStream( )
and
getOutputStream( )
to produce the corresponding InputStream and OutputStream objects
from each Socket. These must be wrapped inside buffers and formatting
classes just like any other stream object described in Chapter 11.
[ Add Comment ]
The use of the term ServerSocket
would seem to be another example of a confusing naming scheme in the Java
libraries. You might think ServerSocket would be better named
“ServerConnector” or something without the word “Socket”
in it. You might also think that ServerSocket and Socket should
both be inherited from some common base class. Indeed, the two classes do have
several methods in common, but not enough to give them a common base class.
Instead, ServerSocket’s job is to wait until some other machine
connects to it, then to return an actual Socket. This is why
ServerSocket seems to be a bit misnamed, since its job isn’t really
to be a socket but instead to make a Socket object when someone else
connects to it.
[ Add Comment ]
However, the ServerSocket does
create a physical “server” or listening socket on the host machine.
This socket listens for incoming connections and then returns an
“established” socket (with the local and remote endpoints defined)
via the accept( ) method. The confusing part is that both of these
sockets (listening and established) are associated with the same server socket.
The listening socket can accept only new connection requests and not data
packets. So while ServerSocket doesn’t make much sense
programmatically, it does “physically.”
[ Add Comment ]
When you create a ServerSocket,
you give it only a port number. You don’t have to give it an IP address
because it’s already on the machine it represents. When you create a
Socket, however, you must give both the IP address and the port number
where you’re trying to connect. (However, the Socket that comes
back from ServerSocket.accept( ) already contains all this
information.)
[ Add Comment ]
This example makes the simplest use of
servers and clients using sockets. All the server does is wait for a connection,
then uses the Socket produced by that connection to create an
InputStream and OutputStream. These are converted to a
Reader and a Writer, then wrapped in a BufferedReader and a
PrintWriter. After that, everything it reads from the
BufferedReader it echoes to the PrintWriter until it receives the
line “END,” at which time it closes the connection.
[ Add Comment ]
The client makes the connection to the
server, then creates an OutputStream and performs the same wrapping as in
the server. Lines of text are sent through the resulting PrintWriter. The
client also creates an InputStream (again, with appropriate conversions
and wrapping) to hear what the server is saying (which, in this case, is just
the words echoed back).
[ Add Comment ]
Both the server and client use the same
port number and the client uses the local loopback address to connect to the
server on the same machine so you don’t have to test it over a network.
(For some configurations, you might need to be connected to a network for
the programs to work, even if you aren’t communicating over that
network.)
[ Add Comment ]
Here is the server:
//: c15:JabberServer.java
// Very simple server that just
// echoes whatever the client sends.
import java.io.*;
import java.net.*;

public class JabberServer {
  // Choose a port outside of the range 1-1024:
  public static final int PORT = 8080;
  public static void main(String[] args)
      throws IOException {
    ServerSocket s = new ServerSocket(PORT);
    System.out.println("Started: " + s);
    try {
      // Blocks until a connection occurs:
      Socket socket = s.accept();
      try {
        System.out.println(
          "Connection accepted: "+ socket);
        BufferedReader in =
          new BufferedReader(
            new InputStreamReader(
              socket.getInputStream()));
        // Output is automatically flushed
        // by PrintWriter:
        PrintWriter out =
          new PrintWriter(
            new BufferedWriter(
              new OutputStreamWriter(
                socket.getOutputStream())),true);
        while (true) {
          String str = in.readLine();
          if (str.equals("END")) break;
          System.out.println("Echoing: " + str);
          out.println(str);
        }
      // Always close the two sockets...
      } finally {
        System.out.println("closing...");
        socket.close();
      }
    } finally {
      s.close();
    }
  }
} ///:~
You can see that the ServerSocket
just needs a port number, not an IP address (since it’s running on
this machine!). When you call accept( ), the method
blocks until some client tries to connect to it. That is, it’s
there waiting for a connection, but other processes can run (see Chapter 14).
When a connection is made, accept( ) returns with a Socket
object representing that connection.
[ Add Comment ]
The responsibility for cleaning up the
sockets is crafted carefully here. If the ServerSocket constructor fails,
the program just quits (notice we must assume that the constructor for
ServerSocket doesn’t leave any open network sockets lying around if
it fails). For this case, main( ) throws IOException
so a try block is not necessary. If the ServerSocket constructor
is successful then all other method calls must be guarded in a
try-finally block to ensure that, no matter how the block is left, the
ServerSocket is properly closed.
[ Add Comment ]
The same logic is used for the
Socket returned by accept( ). If accept( ) fails,
then we must assume that the Socket doesn’t exist or hold any
resources, so it doesn’t need to be cleaned up. If it’s successful,
however, the following statements must be in a try-finally block so that
if they fail the Socket will still be cleaned up. Care is required here
because sockets use important nonmemory resources, so you must be diligent in
order to clean them up (since there is no destructor in Java to do it for you).
[ Add Comment ]
Both the ServerSocket and the
Socket produced by accept( ) are printed to
System.out. This means that their toString( ) methods are
automatically called. These produce:
ServerSocket[addr=0.0.0.0,PORT=0,localport=8080]
Socket[addr=127.0.0.1,PORT=1077,localport=8080]
Shortly, you’ll see how these fit
together with what the client is doing.
[ Add Comment ]
The next part of the program looks just
like opening files for reading and writing except that the InputStream
and OutputStream are created from the Socket object. Both the
InputStream and OutputStream objects are converted to
Reader and
Writer objects using the
“converter” classes
InputStreamReader and
OutputStreamWriter,
respectively. You could also have used the Java 1.0
InputStream and
OutputStream classes
directly, but with output there’s a distinct advantage to using the
Writer approach. This appears with
PrintWriter, which has an
overloaded constructor that takes a second argument, a boolean flag that
indicates whether to automatically flush the output at the end of each
println( ) (but not print( )) statement. Every
time you write to out, its buffer must be flushed so the information goes
out over the network. Flushing is important for this particular example because
the client and server each wait for a line from the other party before
proceeding. If flushing doesn’t occur, the information will not be put
onto the network until the buffer is full, which causes lots of problems in this
example.
[ Add Comment ]
When writing network programs you need to
be careful about using automatic flushing. Every time you flush the buffer a
packet must be created and sent. In this case, that’s exactly what we
want, since if the packet containing the line isn’t sent then the
handshaking back and forth between server and client will stop. Put another way,
the end of a line is the end of a message. But in many cases, messages
aren’t delimited by lines so it’s much more efficient to not use
auto flushing and instead let the built-in buffering decide when to build and
send a packet. This way, larger packets can be sent and the process will be
faster.
[ Add Comment ]
Note that, like virtually all streams you
open, these are buffered. There’s an exercise at the end of this chapter
to show you what happens if you don’t buffer the streams (things get
slow).
[ Add Comment ]
The infinite while loop reads
lines from the BufferedReader in and writes information to
System.out and to the PrintWriter out. Note that in
and out could be any streams, they just happen to be connected to the
network.
[ Add Comment ]
When the client sends the line consisting
of “END,” the program breaks out of the loop and closes the
Socket.
Here’s the client:
//: c15:JabberClient.java
// Very simple client that just sends
// lines to the server and reads lines
// that the server sends.
import java.net.*;
import java.io.*;

public class JabberClient {
  public static void main(String[] args)
      throws IOException {
    // Passing null to getByName() produces the
    // special "Local Loopback" IP address, for
    // testing on one machine w/o a network:
    InetAddress addr =
      InetAddress.getByName(null);
    // Alternatively, you can use
    // the address or name:
    // InetAddress addr =
    //    InetAddress.getByName("127.0.0.1");
    // InetAddress addr =
    //    InetAddress.getByName("localhost");
    System.out.println("addr = " + addr);
    Socket socket =
      new Socket(addr, JabberServer.PORT);
    // Guard everything in a try-finally to make
    // sure that the socket is closed:
    try {
      System.out.println("socket = " + socket);
      BufferedReader in =
        new BufferedReader(
          new InputStreamReader(
            socket.getInputStream()));
      // Output is automatically flushed
      // by PrintWriter:
      PrintWriter out =
        new PrintWriter(
          new BufferedWriter(
            new OutputStreamWriter(
              socket.getOutputStream())),true);
      for(int i = 0; i < 10; i ++) {
        out.println("howdy " + i);
        String str = in.readLine();
        System.out.println(str);
      }
      out.println("END");
    } finally {
      System.out.println("closing...");
      socket.close();
    }
  }
} ///:~
In main( ) you can see all
three ways to produce the InetAddress of the local loopback IP address:
using null, localhost, or the explicit reserved address
127.0.0.1. Of course, if you want to connect to a machine across a
network you substitute that machine’s IP address. When the InetAddress
addr is printed (via the automatic call to its toString( )
method) the result is:
[ Add Comment ]
localhost/127.0.0.1
By handing getByName( ) a
null, it defaulted to finding the localhost, and that produced the
special address 127.0.0.1.
[ Add Comment ]
Note that the
Socket called
socket is created with both the InetAddress and the port number.
To understand what it means when you print one of these Socket objects,
remember that an Internet connection is determined uniquely by these four pieces
of data: clientHost, clientPortNumber, serverHost, and
serverPortNumber. When the server comes up, it takes up its assigned port
(8080) on the localhost (127.0.0.1). When the client comes up, it is allocated
to the next available port on its machine, 1077 in this case, which also happens
to be on the same machine (127.0.0.1) as the server. Now, in order for data to
move between the client and server, each side has to know where to send it.
Therefore, during the process of connecting to the “known” server,
the client sends a “return address” so the server knows where to
send its data. This is what you see in the example output for the server
side:
Socket[addr=127.0.0.1,port=1077,localport=8080]
This means that the server just accepted
a connection from 127.0.0.1 on port 1077 while listening on its local port
(8080). On the client side:
[ Add Comment ]
Socket[addr=localhost/127.0.0.1,PORT=8080,localport=1077]
which means that the client made a
connection to 127.0.0.1 on port 8080 using the local port 1077.
[ Add Comment ]
You’ll notice that every time you
start up the client anew, the local port number is incremented. It starts at
1025 (one past the reserved block of ports) and keeps going up until you reboot
the machine, at which point it starts at 1025 again. (On UNIX machines, once the
upper limit of the socket range is reached, the numbers will wrap around to the
lowest available number again.)
[ Add Comment ]
Once the Socket object has been
created, the process of turning it into a BufferedReader and
PrintWriter is the same as in the server (again, in both cases you start
with a Socket). Here, the client initiates the conversation by sending
the string “howdy” followed by a number. Note that the buffer must
again be flushed (which happens automatically via the second argument to the
PrintWriter constructor). If the buffer isn’t flushed, the whole
conversation will hang because the initial “howdy” will never get
sent (the buffer isn’t full enough to cause the send to happen
automatically). Each line that is sent back from the server is written to
System.out to verify that everything is working correctly. To terminate
the conversation, the agreed-upon “END” is sent. If the client
simply hangs up, then the server throws an exception.
[ Add Comment ]
You can see that the same care is taken
here to ensure that the network resources represented by the Socket are
properly cleaned up, using a try-finally block.
[ Add Comment ]
Sockets produce a
“dedicated” connection that persists until
it is explicitly disconnected. (The dedicated connection can still be
disconnected unexplicitly if one side, or an intermediary link, of the
connection crashes.) This means the two parties are locked in communication and
the connection is constantly open. This seems like a logical approach to
networking, but it puts an extra load on the network. Later in this chapter
you’ll see a different approach to networking, in which the connections
are only temporary.
[ Add Comment ]
The JabberServer works, but it can
handle only one client at a time. In a typical server, you’ll want to be
able to deal with many clients at once. The answer is
multithreading, and in languages
that don’t directly support multithreading this means all sorts of
complications. In Chapter 14 you saw that multithreading in Java is about as
simple as possible, considering that multithreading is a rather complex topic.
Because threading in Java is reasonably straightforward, making a server that
handles multiple clients is relatively easy.
[ Add Comment ]
The basic scheme is to make a single
ServerSocket in the server and call accept( ) to wait for a
new connection. When accept( ) returns, you take the resulting
Socket and use it to create a new thread whose job is to serve that
particular client. Then you call accept( ) again to wait for a new
client.
[ Add Comment ]
In the following server code, you can see
that it looks similar to the JabberServer.java example except that all of
the operations to serve a particular client have been moved inside a separate
thread class:
//: c15:MultiJabberServer.java
// A server that uses multithreading
// to handle any number of clients.
import java.io.*;
import java.net.*;

class ServeOneJabber extends Thread {
  private Socket socket;
  private BufferedReader in;
  private PrintWriter out;
  public ServeOneJabber(Socket s)
      throws IOException {
    socket = s;
    in =
      new BufferedReader(
        new InputStreamReader(
          socket.getInputStream()));
    // Enable auto-flush:
    out =
      new PrintWriter(
        new BufferedWriter(
          new OutputStreamWriter(
            socket.getOutputStream())), true);
    // If any of the above calls throw an
    // exception, the caller is responsible for
    // closing the socket. Otherwise the thread
    // will close it.
    start(); // Calls run()
  }
  public void run() {
    try {
      while (true) {
        String str = in.readLine();
        if (str.equals("END")) break;
        System.out.println("Echoing: " + str);
        out.println(str);
      }
      System.out.println("closing...");
    } catch(IOException e) {
      System.err.println("IO Exception");
    } finally {
      try {
        socket.close();
      } catch(IOException e) {
        System.err.println("Socket not closed");
      }
    }
  }
}

public class MultiJabberServer {
  static final int PORT = 8080;
  public static void main(String[] args)
      throws IOException {
    ServerSocket s = new ServerSocket(PORT);
    System.out.println("Server Started");
    try {
      while(true) {
        // Blocks until a connection occurs:
        Socket socket = s.accept();
        try {
          new ServeOneJabber(socket);
        } catch(IOException e) {
          // If it fails, close the socket,
          // otherwise the thread will close it:
          socket.close();
        }
      }
    } finally {
      s.close();
    }
  }
} ///:~
The ServeOneJabber thread takes
the Socket object that’s produced by accept( ) in
main( ) every time a new client makes a connection. Then, as before,
it creates a BufferedReader and auto-flushed PrintWriter object
using the Socket. Finally, it calls the special Thread method
start( ), which performs thread initialization and then calls
run( ). This performs the same kind of action as in the previous
example: reading something from the socket and then echoing it back until it
reads the special “END” signal.
[ Add Comment ]
The responsibility for cleaning up the
socket must again be carefully designed. In this case, the socket is created
outside of the ServeOneJabber so the responsibility can be shared. If the
ServeOneJabber constructor fails, it will just throw the exception to the
caller, who will then clean up the thread. But if the constructor succeeds, then
the ServeOneJabber object takes over responsibility for cleaning up the
thread, in its run( ).
[ Add Comment ]
Notice the simplicity of the
MultiJabberServer. As before, a ServerSocket is created and
accept( ) is called to allow a new connection. But this time, the
return value of accept( ) (a Socket) is passed to the
constructor for ServeOneJabber, which creates a new thread to handle that
connection. When the connection is terminated, the thread simply goes away.
[ Add Comment ]
If the creation of the
ServerSocket fails, the exception is again thrown through
main( ). But if the creation succeeds, the outer try-finally
guarantees its cleanup. The inner try-catch guards only against the
failure of the ServeOneJabber constructor; if the constructor succeeds,
then the ServeOneJabber thread will close the associated socket.
[ Add Comment ]
To test that the server really does
handle multiple clients, the following program creates many clients (using
threads) that connect to the same server. The maximum number of threads allowed
is determined by the final int MAX_THREADS.
//: c15:MultiJabberClient.java
// Client that tests the MultiJabberServer
// by starting up multiple clients.
import java.net.*;
import java.io.*;

class JabberClientThread extends Thread {
  private Socket socket;
  private BufferedReader in;
  private PrintWriter out;
  private static int counter = 0;
  private int id = counter++;
  private static int threadcount = 0;
  public static int threadCount() {
    return threadcount;
  }
  public JabberClientThread(InetAddress addr) {
    System.out.println("Making client " + id);
    threadcount++;
    try {
      socket =
        new Socket(addr, MultiJabberServer.PORT);
    } catch(IOException e) {
      System.err.println("Socket failed");
      // If the creation of the socket fails,
      // nothing needs to be cleaned up.
    }
    try {
      in =
        new BufferedReader(
          new InputStreamReader(
            socket.getInputStream()));
      // Enable auto-flush:
      out =
        new PrintWriter(
          new BufferedWriter(
            new OutputStreamWriter(
              socket.getOutputStream())), true);
      start();
    } catch(IOException e) {
      // The socket should be closed on any
      // failures other than the socket
      // constructor:
      try {
        socket.close();
      } catch(IOException e2) {
        System.err.println("Socket not closed");
      }
    }
    // Otherwise the socket will be closed by
    // the run() method of the thread.
  }
  public void run() {
    try {
      for(int i = 0; i < 25; i++) {
        out.println("Client " + id + ": " + i);
        String str = in.readLine();
        System.out.println(str);
      }
      out.println("END");
    } catch(IOException e) {
      System.err.println("IO Exception");
    } finally {
      // Always close it:
      try {
        socket.close();
      } catch(IOException e) {
        System.err.println("Socket not closed");
      }
      threadcount--; // Ending this thread
    }
  }
}

public class MultiJabberClient {
  static final int MAX_THREADS = 40;
  public static void main(String[] args)
      throws IOException, InterruptedException {
    InetAddress addr =
      InetAddress.getByName(null);
    while(true) {
      if(JabberClientThread.threadCount()
         < MAX_THREADS)
        new JabberClientThread(addr);
      Thread.currentThread().sleep(100);
    }
  }
} ///:~
The JabberClientThread constructor
takes an InetAddress and uses it to open a Socket. You’re
probably starting to see the pattern: the Socket is always used to create
some kind of Reader and/or Writer (or InputStream and/or
OutputStream) object, which is the only way that the Socket can be
used. (You can, of course, write a class or two to automate this process instead
of doing all the typing if it becomes painful.) Again, start( )
performs thread initialization and calls run( ). Here, messages are
sent to the server and information from the server is echoed to the screen.
However, the thread has a limited lifetime and eventually completes. Note that
the socket is cleaned up if the constructor fails after the socket is created
but before the constructor completes. Otherwise the responsibility for calling
close( ) for the socket is relegated to the run( )
method.
[ Add Comment ]
The threadcount keeps track of how
many JabberClientThread objects currently exist. It is incremented as
part of the constructor and decremented as run( ) exits (which means
the thread is terminating). In MultiJabberClient.main( ), you can
see that the number of threads is tested, and if there are too many, no more are
created. Then the method sleeps. This way, some threads will eventually
terminate and more can be created. You can experiment with MAX_THREADS to
see where your particular system begins to have trouble with too many
connections.
[ Add Comment ]
The examples you’ve seen so far use
the
Transmission
Control Protocol (TCP, also known as
stream-based
sockets), which is designed for ultimate reliability and guarantees that the
data will get there. It allows retransmission of lost data, it provides multiple
paths through different routers in case one goes down, and bytes are delivered
in the order they are sent. All this control and reliability comes at a cost:
TCP has a high overhead.
[ Add Comment ]
There’s a second protocol, called
User
Datagram Protocol (UDP), which doesn’t guarantee that the packets will
be delivered and doesn’t guarantee that they will arrive in the order they
were sent. It’s called an
“unreliable
protocol” (TCP is a
“reliable
protocol”), which sounds bad, but because it’s much faster it can be
useful. There are some applications, such as an audio signal, in which it
isn’t so critical if a few packets are dropped here or there but speed is
vital. Or consider a time-of-day server, where it really doesn’t matter if
one of the messages is lost. Also, some applications might be able to fire off a
UDP message to a server and can then assume, if there is no response in a
reasonable period of time, that the message was lost.
[ Add Comment ]
Typically, you’ll do most of your
direct network programming with TCP, and only occasionally will you use UDP.
There’s a more complete treatment of UDP, including an example, in the
first edition of this book (available on the CD ROM bound into this book, or as
a free download from www.BruceEckel.com).
[ Add Comment ]
It’s possible for an applet to
cause the display of any URL through the Web browser the applet is running
within. You can do this with the following line:
getAppletContext().showDocument(u);
in
which u is the URL object. Here’s a simple example that
redirects you to another Web page. Although you’re just redirected to an
HTML page, you could also redirect to the output of a CGI program.
[ Add Comment ]
//: c15:ShowHTML.java
// <applet code=ShowHTML width=100 height=50>
// </applet>
import javax.swing.*;
import java.awt.*;
import java.awt.event.*;
import java.net.*;
import java.io.*;
import com.bruceeckel.swing.*;

public class ShowHTML extends JApplet {
  JButton send = new JButton("Go");
  JLabel l = new JLabel();
  public void init() {
    Container cp = getContentPane();
    cp.setLayout(new FlowLayout());
    send.addActionListener(new Al());
    cp.add(send);
    cp.add(l);
  }
  class Al implements ActionListener {
    public void actionPerformed(ActionEvent ae) {
      try {
        // This could be a CGI program instead of
        // an HTML page.
        URL u = new URL(getDocumentBase(),
          "FetcherFrame.html");
        // Display the output of the URL using
        // the Web browser, as an ordinary page:
        getAppletContext().showDocument(u);
      } catch(Exception e) {
        l.setText(e.toString());
      }
    }
  }
  public static void main(String[] args) {
    Console.run(new ShowHTML(), 100, 50);
  }
} ///:~
The beauty of the
URL class is how much it
shields you from. You can connect to Web servers without knowing much at all
about what’s going on under the covers.
[ Add Comment ]
A variation on the above program reads a
file located on the server. In this case, the file is specified by the
client:
//: c15:Fetcher.java
// <applet code=Fetcher width=500 height=300>
// </applet>
import javax.swing.*;
import java.awt.*;
import java.awt.event.*;
import java.net.*;
import java.io.*;
import com.bruceeckel.swing.*;

public class Fetcher extends JApplet {
  JButton fetchIt= new JButton("Fetch the Data");
  JTextField f =
    new JTextField("Fetcher.java", 20);
  JTextArea t = new JTextArea(10,40);
  public void init() {
    Container cp = getContentPane();
    cp.setLayout(new FlowLayout());
    fetchIt.addActionListener(new FetchL());
    cp.add(new JScrollPane(t));
    cp.add(f); cp.add(fetchIt);
  }
  public class FetchL implements ActionListener {
    public void actionPerformed(ActionEvent e) {
      try {
        URL url = new URL(getDocumentBase(),
          f.getText());
        t.setText(url + "\n");
        InputStream is = url.openStream();
        BufferedReader in = new BufferedReader(
          new InputStreamReader(is));
        String line;
        while ((line = in.readLine()) != null)
          t.append(line + "\n");
      } catch(Exception ex) {
        t.append(ex.toString());
      }
    }
  }
  public static void main(String[] args) {
    Console.run(new Fetcher(), 500, 300);
  }
} ///:~
The creation of the URL object is
similar to the previous example—getDocumentBase( ) is the
starting point as before, but this time the name of the file is read from the
JTextField. Once the URL object is created, its String
version is placed in the JTextArea so we can see what it looks like. Then
an InputStream is procured from the URL, which in this case will
simply produce a stream of the characters in the file. After converting to a
Reader and buffering, each line is read and appended to the
JTextArea. Note that the JTextArea has been placed inside a
JScrollPane so that scrolling is handled automatically.
[ Add Comment ]
There’s actually a lot more to
networking than can be covered in this introductory treatment. Java networking
also provides fairly extensive support for URLs, including protocol handlers for
different types of content that can be discovered at an Internet site. You can
find other Java networking features fully and carefully described in Java
Network Programming by Elliotte Rusty Harold (O’Reilly, 1997).
[ Add Comment ]
It has been estimated that half of all
software development involves client/server operations. A great promise of Java
has been the ability to build platform-independent client/server database
applications. This has come to fruition with
Java
DataBase Connectivity (JDBC).
[ Add Comment ]
One of the major problems with databases
has been the feature wars between the database companies. There is a
“standard” database language,
Structured Query Language
(SQL-92), but you must usually know which database vendor you’re working
with despite the standard. JDBC is designed to be platform-independent, so you
don’t need to worry about the database you’re using while
you’re programming. However, it’s still possible to make
vendor-specific calls from JDBC so you aren’t restricted from doing what
you must.
[ Add Comment ]
One place where programmers may need to
use SQL type names is in the SQL TABLE
CREATE statement when they are creating a new
database table and defining the SQL type for each column. Unfortunately there
are significant variations between SQL types supported by different database
products. Different databases that support SQL types with the same semantics and
structure may give those types different names. Most major databases support an
SQL data type for large binary values: in Oracle this type is called a
LONG RAW,
Sybase calls it
IMAGE,
Informix calls it
BYTE, and
DB2 calls it LONG VARCHAR FOR BIT
DATA. Therefore, if database portability is a
goal you should try to use only generic SQL type identifiers.
[ Add Comment ]
Portability is an issue when writing for
a book where readers may be testing the examples with all kinds of unknown data
stores. I have tried to write these examples to be as portable as possible. You
should also notice that the database-specific code has been isolated in order to
centralize any changes that you may need to perform to get the examples
operational in your environment.
[ Add Comment ]
JDBC, like many of the APIs in Java, is
designed for simplicity. The method calls you make correspond to the logical
operations you’d think of doing when gathering data from a database:
connect to the database, create a statement and execute the query, and look at
the result set.
[ Add Comment ]
To allow this platform independence, JDBC
provides a driver manager that dynamically maintains all the driver
objects that your database queries will need. So if you have three different
kinds of vendor databases to connect to, you’ll need three different
driver objects. The driver objects register themselves with the driver manager
at the time of loading, and you can force the loading using
Class.forName( ).
[ Add Comment ]
All
this information is combined into one string, the “database URL.”
For example, to connect through the ODBC subprotocol to a database identified as
“people,” the database URL could be:
[ Add Comment ]
String dbUrl = "jdbc:odbc:people";
If you’re connecting across a
network, the database URL will contain the connection information identifying
the remote machine and can become a bit intimidating. Here is an example of a
CloudScape database being called from a remote client utilizing RMI:
[ Add Comment ]
jdbc:rmi://192.168.170.27:1099/jdbc:cloudscape:db
This database URL is really two jdbc
calls in one. The first part
“jdbc:rmi://192.168.170.27:1099/”
uses RMI to make the connection to the remote database engine listening on port
1099 at IP Address 192.168.170.27. The second part of the URL,
“jdbc:cloudscape:db”
conveys the more typical settings using the subprotocol and database name but
this will only happen after the first section has made the connection via RMI to
the remote machine.
[ Add Comment ]
When you’re ready to connect to the
database, call the static method
DriverManager.getConnection( ) and pass it the database URL, the
user name, and a password to get into the database. You get back a
Connection object that you can then use to query and manipulate the
database.
[ Add Comment ]
The following example opens a database of
contact information and looks for a person’s last name as given on the
command line. It selects only the names of people that have email addresses,
then prints out all the ones that match the given last name:
//: c15:jdbc:Lookup.java
// Looks up email addresses in a
// local database using JDBC.
import java.sql.*;

public class Lookup {
  public static void main(String[] args)
  throws SQLException, ClassNotFoundException {
    String dbUrl = "jdbc:odbc:people";
    String user = "";
    String password = "";
    // Load the driver (registers itself)
    Class.forName(
      "sun.jdbc.odbc.JdbcOdbcDriver");
    Connection c = DriverManager.getConnection(
      dbUrl, user, password);
    Statement s = c.createStatement();
    // SQL code:
    ResultSet r =
      s.executeQuery(
        "SELECT FIRST, LAST, EMAIL " +
        "FROM people.csv people " +
        "WHERE " +
        "(LAST='" + args[0] + "') " +
        " AND (EMAIL Is Not Null) " +
        "ORDER BY FIRST");
    while(r.next()) {
      // Capitalization doesn't matter:
      System.out.println(
        r.getString("Last") + ", "
        + r.getString("fIRST")
        + ": " + r.getString("EMAIL") );
    }
    s.close(); // Also closes ResultSet
  }
} ///:~
You can see the creation of the database
URL as previously described. In this example, there is no password protection on
the database so the user name and password are empty strings.
[ Add Comment ]
Once the connection is made with
DriverManager.getConnection( ), you can use the resulting
Connection object to create a Statement object using the
createStatement( )
method. With the resulting
Statement, you can call
executeQuery( ),
passing in a string containing an SQL-92 standard SQL statement. (You’ll
see shortly how you can generate this statement automatically, so you
don’t have to know much about SQL.)
[ Add Comment ]
The executeQuery( ) method
returns a ResultSet
object, which is an iterator: the next( ) method moves the iterator
to the next record in the statement, or returns false if the end of the
result set has been reached. You’ll always get a ResultSet object
back from executeQuery( ) even if a query results in an empty set
(that is, an exception is not thrown). Note that you must call
next( ) once before trying to read any record data. If the result
set is empty, this first call to next( ) will return false.
For each record in the result set, you can select the fields using (among other
approaches) the field name as a string. Also note that the capitalization of the
field name is ignored—it doesn’t matter with an SQL database. You
determine the type you’ll get back by calling
getInt( ),
getString( ),
getFloat( ), etc. At
this point, you’ve got your database data in Java native format and can do
whatever you want with it using ordinary Java code.
[ Add Comment ]
With JDBC, understanding the code is
relatively simple. The confusing part is making it work on your particular
system. The reason this is confusing is that it requires you to figure out how
to get your JDBC driver to load properly, and how to set up a database using
your database administration software.
[ Add Comment ]
Of course, this process can vary
radically from machine to machine, but the process I used to make it work under
32-bit Windows might give you clues to help you attack your own situation.
[ Add Comment ]
The program above contains the
statement:
Class.forName("sun.jdbc.odbc.JdbcOdbcDriver");This implies a directory structure, which
is deceiving. With this particular installation of JDK 1.1, there was no file
called JdbcOdbcDriver.class, so if you looked at this example and went
searching for it you’d be frustrated. Other published examples use a
pseudo name, such as “myDriver.ClassName,” which is less than
helpful. In fact, the load statement above for the jdbc-odbc driver (the only
one that actually comes with the JDK) appears in only a few places in the online
documentation (in particular, a page labeled “JDBC-ODBC Bridge
Driver”). If the load statement above doesn’t work, then the name
might have been changed as part of a Java version change, so you should hunt
through the documentation again.
[ Add Comment ]
If the load statement is wrong,
you’ll get an exception at this point. To test whether your driver load
statement is working correctly, comment out the code after the statement and up
to the catch clause; if the program throws no exceptions it means that
the driver is loading properly.
[ Add Comment ]
Again, this is specific to 32-bit
Windows; you might need to do some research to figure it out for your own
platform.
[ Add Comment ]
First, open the control panel. You might
find two icons that say “ODBC.” You must use the one that says
“32bit ODBC,” since the other one is for backward compatibility with
16-bit ODBC software and will produce no results for JDBC. When you open the
“32bit ODBC” icon, you’ll see a tabbed dialog with a number of
tabs, including “User DSN,” “System DSN,” “File
DSN,” etc., in which “DSN” means “Data Source
Name.” It turns out that for the JDBC-ODBC bridge, the only place where
it’s important to set up your database is “System DSN,” but
you’ll also want to test your configuration and create queries, and for
that you’ll also need to set up your database in “File DSN.”
This will allow the Microsoft Query tool (that comes with Microsoft Office) to
find the database. Note that other query tools are also available from other
vendors.
[ Add Comment ]
The most interesting database is one that
you’re already using. Standard ODBC supports a number of different file
formats including such venerable workhorses as DBase. However, it also includes
the simple “comma-separated ASCII” format, which virtually every
data tool has the ability to write. In my case, I just took my
“people” database that I’ve been maintaining for years using
various contact-management tools and exported it as a comma-separated ASCII file
(these typically have an extension of .csv). In the “System
DSN” section I chose “Add,” chose the text driver to handle my
comma-separated ASCII file, and then un-checked “use current
directory” to allow me to specify the directory where I exported the data
file.
[ Add Comment ]
You’ll notice when you do this that
you don’t actually specify a file, only a directory. That’s because
a database is typically represented as a collection of files under a single
directory (although it could be represented in other forms as well). Each file
usually contains a single table, and the SQL statements can produce results that
are culled from multiple tables in the database (this is called a
join). A database that
contains only a single table (like my “people” database) is usually
called a
flat-file
database. Most problems that go beyond the simple storage and retrieval of
data generally require multiple tables that must be related by joins to produce
the desired results, and these are called
relational
databases.
[ Add Comment ]
To test the configuration you’ll
need a way to discover whether the database is visible from a program that
queries it. Of course, you can simply run the JDBC program example above, up to
and including the statement:
Connection c = DriverManager.getConnection(
  dbUrl, user, password);
If an exception is thrown, your
configuration was incorrect.
[ Add Comment ]
However, it’s useful to get a
query-generation tool involved at this point. I used Microsoft Query that came
with Microsoft Office, but you might prefer something else. The query tool must
know where the database is, and Microsoft Query required that I go to the ODBC
Administrator’s “File DSN” tab and add a new entry there,
again specifying the text driver and the directory where my database lives. You
can name the entry anything you want, but it’s helpful to use the same
name you used in “System DSN.”
[ Add Comment ]
Once you’ve done this, you will see
that your database is available when you create a new query using your query
tool.
[ Add Comment ]
The query that I created using Microsoft
Query not only showed me that my database was there and in good order, but it
also automatically created the SQL code that I needed to insert into my Java
program. I wanted a query that would search for records that had the last name
that was typed on the command line when starting the Java program. So as a
starting point, I searched for a specific last name, “Eckel.” I also
wanted to display only those names that had email addresses associated with
them. The steps I took to create this query were:
The result of this
query will show you whether you’re getting what you want.
[ Add Comment ]
Now you can press the SQL button and
without any research on your part, up will pop the correct SQL code, ready for
you to cut and paste. For this query, it looked like this:
SELECT people.FIRST, people.LAST, people.EMAIL
FROM people.csv people
WHERE (people.LAST='Eckel') AND
(people.EMAIL Is Not Null)
ORDER BY people.FIRST
Especially with more complicated queries
it’s easy to get things wrong, but by using a query tool you can
interactively test your queries and automatically generate the correct code.
It’s hard to argue the case for doing this by hand.
[ Add Comment ]
You’ll notice that the code above
looks different from what’s used in the program. That’s because the
query tool uses full qualification for all of the names, even when there’s
only one table involved. (When more than one table is involved, the
qualification prevents collisions between columns from different tables that
have the same names.) Since this query involves only one table, you can
optionally remove the “people” qualifier from most of the names,
like this:
[ Add Comment ]
SELECT FIRST, LAST, EMAIL
FROM people.csv people
WHERE (LAST='Eckel') AND
(EMAIL Is Not Null)
ORDER BY FIRST
In addition, you don’t want this
program to be hard coded to look for only one name. Instead, it should hunt for
the name given as the command-line argument. Making these changes and turning
the SQL statement into a dynamically-created String produces:
[ Add Comment ]
"SELECT FIRST, LAST, EMAIL " +
"FROM people.csv people " +
"WHERE " +
"(LAST='" + args[0] + "') " +
" AND (EMAIL Is Not Null) " +
"ORDER BY FIRST");
SQL has another way to insert names into
a query called
stored
procedures, which is used for speed. But for much of your database
experimentation and for your first cut, building your own query strings in Java
is fine.
[ Add Comment ]
You can see from this example that by
using the tools currently available—in particular the query-building
tool—database programming with SQL and JDBC can be quite straightforward.
[ Add Comment ]
It’s more useful to leave the
lookup program running all the time and simply switch to it and type in a name
whenever you want to look someone up. The following program creates the lookup
program as an application/applet, and it also adds name completion so the data
will show up without forcing you to type the entire last name:
//: c15:jdbc:VLookup.java
// GUI version of Lookup.java.
// <applet code=VLookup
// width=500 height=200></applet>
import javax.swing.*;
import java.awt.*;
import java.awt.event.*;
import javax.swing.event.*;
import java.sql.*;
import com.bruceeckel.swing.*;

public class VLookup extends JApplet {
  String dbUrl = "jdbc:odbc:people";
  String user = "";
  String password = "";
  Statement s;
  JTextField searchFor = new JTextField(20);
  JLabel completion =
    new JLabel("                        ");
  JTextArea results = new JTextArea(40, 20);
  public void init() {
    searchFor.getDocument().addDocumentListener(
      new SearchL());
    JPanel p = new JPanel();
    p.add(new Label("Last name to search for:"));
    p.add(searchFor);
    p.add(completion);
    Container cp = getContentPane();
    cp.add(p, BorderLayout.NORTH);
    cp.add(results, BorderLayout.CENTER);
    try {
      // Load the driver (registers itself)
      Class.forName(
        "sun.jdbc.odbc.JdbcOdbcDriver");
      Connection c = DriverManager.getConnection(
        dbUrl, user, password);
      s = c.createStatement();
    } catch(Exception e) {
      results.setText(e.toString());
    }
  }
  class SearchL implements DocumentListener {
    public void changedUpdate(DocumentEvent e){}
    public void insertUpdate(DocumentEvent e){
      textValueChanged();
    }
    public void removeUpdate(DocumentEvent e){
      textValueChanged();
    }
  }
  public void textValueChanged() {
    ResultSet r;
    if(searchFor.getText().length() == 0) {
      completion.setText("");
      results.setText("");
      return;
    }
    try {
      // Name completion:
      r = s.executeQuery(
        "SELECT LAST FROM people.csv people " +
        "WHERE (LAST Like '" +
        searchFor.getText()  +
        "%') ORDER BY LAST");
      if(r.next())
        completion.setText(
          r.getString("last"));
      r = s.executeQuery(
        "SELECT FIRST, LAST, EMAIL " +
        "FROM people.csv people " +
        "WHERE (LAST='" +
        completion.getText() +
        "') AND (EMAIL Is Not Null) " +
        "ORDER BY FIRST");
    } catch(Exception e) {
      results.setText(
        searchFor.getText() + "\n");
      results.append(e.toString());
      return;
    }
    results.setText("");
    try {
      while(r.next()) {
        results.append(
          r.getString("Last") + ", "
          + r.getString("fIRST") +
          ": " + r.getString("EMAIL") + "\n");
      }
    } catch(Exception e) {
      results.setText(e.toString());
    }
  }
  public static void main(String[] args) {
    Console.run(new VLookup(), 500, 200);
  }
} ///:~
Much of the database logic is the same,
but you can see that a DocumentListener is added to listen to the
JTextField (see the javax.swing.JTextField entry in the Java HTML
documentation from java.sun.com for details), so that whenever you type a
new character it first tries to do a name completion by looking up the last name
in the database and using the first one that shows up. (It places it in the
completion JLabel, and uses that as the lookup text.) This way, as
soon as you’ve typed enough characters for the program to uniquely find
the name you’re looking for, you can stop.
[ Add Comment ]
When you browse the online documentation
for JDBC it can seem daunting. In particular, in the
DatabaseMetaData
interface—which is just huge, contrary to most of the interfaces you see
in Java—there are methods such as
dataDefinitionCausesTransactionCommit( ),
getMaxColumnNameLength( ), getMaxStatementLength( ),
storesMixedCaseQuotedIdentifiers( ),
supportsANSI92IntermediateSQL( ),
supportsLimitedOuterJoins( ), and so on. What’s this all
about?
[ Add Comment ]
As mentioned earlier, databases have
seemed from their inception to be in a constant state of turmoil, primarily
because the demand for database applications, and thus database tools, is so
great. Only recently has there been any convergence on the common language of
SQL (and there are plenty of other database languages in common use). But even
with an SQL “standard” there are so many variations on that theme
that JDBC must provide the large DatabaseMetaData interface so that your
code can discover the capabilities of the particular “standard” SQL
database that it’s currently connected to. In short, you can write simple,
transportable SQL, but if you want to optimize speed your coding will multiply
tremendously as you investigate the capabilities of a particular vendor’s
database.
[ Add Comment ]
This, of course, is not Java’s
fault. The discrepancies between database products are just something that JDBC
tries to help compensate for. But bear in mind that your life will be easier if
you can either write generic queries and not worry quite as much about
performance, or, if you must tune for performance, know the platform
you’re writing for so you don’t need to write all that investigation
code.
[ Add Comment ]
A more interesting
example[73]
involves a multitable database that resides on a server. Here, the database is
meant to provide a repository for community activities and to allow people to
sign up for these events, so it is called the Community Interests Database
(CID). This example will only provide an overview of the database and its
implementation, and is not intended to be an in-depth tutorial on database
development. There are numerous books, seminars, and software packages that will
help you in the design and development of a database.
[ Add Comment ]
In addition, this example presumes the
prior installation of an SQL database on a server (although it could also be run
on a local machine), and the interrogation and discovery of an appropriate JDBC
driver for that database. Several free SQL databases are available, and some are
even automatically installed with various flavors of Linux. You are responsible
for making the choice of database and locating the JDBC driver; the example here
is based on an SQL database system called “Cloudscape.”
[ Add Comment ]
To keep changes in the connection
information simple, the database driver, database URL, user name, and password
are placed in a separate class:
//: c15:jdbc:CIDConnect.java
// Database connection information for
// the community interests database (CID).

public class CIDConnect {
  // All the information specific to CloudScape:
  public static String dbDriver =
    "COM.cloudscape.core.JDBCDriver";
  public static String dbURL =
    "jdbc:cloudscape:d:/docs/_work/JSapienDB";
  public static String user = "";
  public static String password = "";
} ///:~
In this example, there is no password
protection on the database so the user name and password are empty strings.
[ Add Comment ]
The database consists of a set of tables
that have a structure as shown here:
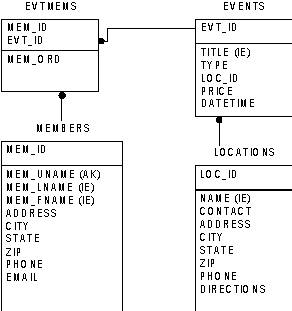
“Members” contains community
member information, “Events” and “Locations” contain
information about the activities and where they take place, and
“Evtmems” connects events and members that would like to attend that
event. You can see that a data member in one table produces a key in another
table.
[ Add Comment ]
The following class contains the SQL
strings that will create these database tables (refer to an SQL guide for an
explanation of the SQL code):
[ Add Comment ]
//: c15:jdbc:CIDSQL.java
// SQL strings to create the tables for the CID.

public class CIDSQL {
  public static String[] sql = {
    // Create the MEMBERS table:
    "drop table MEMBERS",
    "create table MEMBERS " +
    "(MEM_ID INTEGER primary key, " +
    "MEM_UNAME VARCHAR(12) not null unique, "+
    "MEM_LNAME VARCHAR(40), " +
    "MEM_FNAME VARCHAR(20), " +
    "ADDRESS VARCHAR(40), " +
    "CITY VARCHAR(20), " +
    "STATE CHAR(4), " +
    "ZIP CHAR(5), " +
    "PHONE CHAR(12), " +
    "EMAIL VARCHAR(30))",
    "create unique index " +
    "LNAME_IDX on MEMBERS(MEM_LNAME)",
    // Create the EVENTS table
    "drop table EVENTS",
    "create table EVENTS " +
    "(EVT_ID INTEGER primary key, " +
    "EVT_TITLE VARCHAR(30) not null, " +
    "EVT_TYPE VARCHAR(20), " +
    "LOC_ID INTEGER, " +
    "PRICE DECIMAL, " +
    "DATETIME TIMESTAMP)",
    "create unique index " +
    "TITLE_IDX on EVENTS(EVT_TITLE)",
    // Create the EVTMEMS table
    "drop table EVTMEMS",
    "create table EVTMEMS " +
    "(MEM_ID INTEGER not null, " +
    "EVT_ID INTEGER not null, " +
    "MEM_ORD INTEGER)",
    "create unique index " +
    "EVTMEM_IDX on EVTMEMS(MEM_ID, EVT_ID)",
    // Create the LOCATIONS table
    "drop table LOCATIONS",
    "create table LOCATIONS " +
    "(LOC_ID INTEGER primary key, " +
    "LOC_NAME VARCHAR(30) not null, " +
    "CONTACT VARCHAR(50), " +
    "ADDRESS VARCHAR(40), " +
    "CITY VARCHAR(20), " +
    "STATE VARCHAR(4), " +
    "ZIP VARCHAR(5), " +
    "PHONE CHAR(12), " +
    "DIRECTIONS VARCHAR(4096))",
    "create unique index " +
    "NAME_IDX on LOCATIONS(LOC_NAME)",
  };
} ///:~
The following program uses the
CIDConnect and CIDSQL information to load the JDBC driver, make a
connection to the database, and then create the table structure diagrammed
above. To connect with the database, you call the static method
DriverManager.getConnection( ), passing it the database URL, the
user name, and a password to get into the database. You get back a
Connection object that you can use to query and manipulate the database.
Once the connection is made you can simply push the SQL to the database, in this
case by marching through the CIDSQL array. However, the first time this
program is run, the “drop table” command will fail, causing an
exception, which is caught, reported, and then ignored. The reason for the
“drop table” command is to allow easy experimentation: you can
modify the SQL that defines the tables and then rerun the program, causing the
old tables to be replaced by the new.
[ Add Comment ]
In this example, it makes sense to let
the exceptions be thrown out to the console:
//: c15:jdbc:CIDCreateTables.java
// Creates database tables for the
// community interests database.
import java.sql.*;

public class CIDCreateTables {
  public static void main(String[] args)
  throws SQLException, ClassNotFoundException,
  IllegalAccessException {
    // Load the driver (registers itself)
    Class.forName(CIDConnect.dbDriver);
    Connection c = DriverManager.getConnection(
      CIDConnect.dbURL, CIDConnect.user,
      CIDConnect.password);
    Statement s = c.createStatement();
    for(int i = 0; i < CIDSQL.sql.length; i++) {
      System.out.println(CIDSQL.sql[i]);
      try {
        s.executeUpdate(CIDSQL.sql[i]);
      } catch(SQLException sqlEx) {
        System.err.println(
          "Probably a 'drop table' failed");
      }
    }
    s.close();
    c.close();
  }
} ///:~
Note that all changes in the database can
be controlled by changing Strings in the CIDSQL table, without
modifying CIDCreateTables.
[ Add Comment ]
executeUpdate( ) will usually
return the number of rows that were affected by the SQL statement.
executeUpdate( ) is more commonly used to execute
INSERT,
UPDATE, or
DELETE
statements that modify one or more rows. For statements such as
CREATE
TABLE, DROP
TABLE, and
CREATE
INDEX, executeUpdate( ) always
returns zero.
[ Add Comment ]
To test the database, it is loaded with
some sample data. This requires a series of
INSERTs
followed by a
SELECT to
produce result set. To make additions and changes to the test data easy, the
test data is set up as a two-dimensional array of Objects, and the
executeInsert( ) method can then use the information in one row of
the table to create the appropriate SQL command.
//: c15:jdbc:LoadDB.java
// Loads and tests the database.
import java.sql.*;

class TestSet {
  Object[][] data = {
    { "MEMBERS", new Integer(1),
      "dbartlett", "Bartlett", "David",
      "123 Mockingbird Lane",
      "Gettysburg", "PA", "19312",
      "123.456.7890",  "bart@you.net" },
    { "MEMBERS", new Integer(2),
      "beckel", "Eckel", "Bruce",
      "123 Over Rainbow Lane",
      "Crested Butte", "CO", "81224",
      "123.456.7890", "beckel@you.net" },
    { "MEMBERS", new Integer(3),
      "rcastaneda", "Castaneda", "Robert",
      "123 Downunder Lane",
      "Sydney", "NSW", "12345",
      "123.456.7890", "rcastaneda@you.net" },
    { "LOCATIONS", new Integer(1),
      "Center for Arts",
      "Betty Wright", "123 Elk Ave.",
      "Crested Butte", "CO", "81224",
      "123.456.7890",
      "Go this way then that." },
    { "LOCATIONS", new Integer(2),
      "Witts End Conference Center",
      "John Wittig", "123 Music Drive",
      "Zoneville", "PA", "19123",
      "123.456.7890",
      "Go that way then this." },
    { "EVENTS", new Integer(1),
      "Project Management Myths",
      "Software Development",
      new Integer(1), new Float(2.50),
      "2000-07-17 19:30:00" },
    { "EVENTS", new Integer(2),
      "Life of the Crested Dog",
      "Archeology",
      new Integer(2), new Float(0.00),
      "2000-07-19 19:00:00" },
    // Match some people with events
    {  "EVTMEMS",
      new Integer(1),  // Dave is going to
      new Integer(1),  // the Software event.
      new Integer(0) },
    { "EVTMEMS",
      new Integer(2),  // Bruce is going to
      new Integer(2),  // the Archeology event.
      new Integer(0) },
    { "EVTMEMS",
      new Integer(3),  // Robert is going to
      new Integer(1),  // the Software event.
      new Integer(1) },
    { "EVTMEMS",
      new Integer(3), // ... and
      new Integer(2), // the Archeology event.
      new Integer(1) },
  };
  // Use the default data set:
  public TestSet() {}
  // Use a different data set:
  public TestSet(Object[][] dat) { data = dat; }
}

public class LoadDB {
  Statement statement;
  Connection connection;
  TestSet tset;
  public LoadDB(TestSet t) throws SQLException {
    tset = t;
    try {
      // Load the driver (registers itself)
      Class.forName(CIDConnect.dbDriver);
    } catch(java.lang.ClassNotFoundException e) {
      e.printStackTrace(System.err);
    }
    connection = DriverManager.getConnection(
      CIDConnect.dbURL, CIDConnect.user,
      CIDConnect.password);
    statement = connection.createStatement();
  }
  public void cleanup() throws SQLException {
    statement.close();
    connection.close();
  }
  public void executeInsert(Object[] data) {
    String sql = "insert into "
      + data[0] + " values(";
    for(int i = 1; i < data.length; i++) {
      if(data[i] instanceof String)
        sql += "'" + data[i] + "'";
      else
        sql += data[i];
      if(i < data.length - 1)
        sql += ", ";
    }
    sql += ')';
    System.out.println(sql);
    try {
      statement.executeUpdate(sql);
    } catch(SQLException sqlEx) {
      System.err.println("Insert failed.");
      while (sqlEx != null) {
        System.err.println(sqlEx.toString());
        sqlEx = sqlEx.getNextException();
      }
    }
  }
  public void load() {
    for(int i = 0; i< tset.data.length; i++)
      executeInsert(tset.data[i]);
  }
  // Throw exceptions out to console:
  public static void main(String[] args)
  throws SQLException {
    LoadDB db = new LoadDB(new TestSet());
    db.load();
    try {
      // Get a ResultSet from the loaded database:
      ResultSet rs = db.statement.executeQuery(
        "select " +
        "e.EVT_TITLE, m.MEM_LNAME, m.MEM_FNAME "+
        "from EVENTS e, MEMBERS m, EVTMEMS em " +
        "where em.EVT_ID = 2 " +
        "and e.EVT_ID = em.EVT_ID " +
        "and m.MEM_ID = em.MEM_ID");
      while (rs.next())
        System.out.println(
          rs.getString(1) + "  " +
          rs.getString(2) + ", " +
          rs.getString(3));
    } finally {
      db.cleanup();
    }
  }
} ///:~
The TestSet class contains a
default set of data that is produced if you use the default constructor;
however, you can also create a TestSet object using an alternate data set
with the second constructor. The set of data is held in a two-dimensional array
of Object because it can be any type, including String or
numerical types. The executeInsert( ) method uses RTTI to
distinguish between String data (which must be quoted) and
non-String data as it builds the SQL command from the data. After
printing this command to the console, executeUpdate( ) is used to
send it to the database.
[ Add Comment ]
The constructor for LoadDB makes
the connection, and load( ) steps through the data and calls
executeInsert( ) for each record. cleanup( ) closes the
statement and the connection; to guarantee that this is called, it is placed
inside a finally clause.
[ Add Comment ]
Once the database is loaded, an
executeQuery( ) statement produces a sample result set. Since the
query combines several tables, it is an example of a join.
[ Add Comment ]
There is more JDBC information available
in the electronic documents that come as part of the Java distribution from Sun.
In addition, you can find more in the book JDBC Database Access with Java
(Hamilton, Cattel, and Fisher, Addison-Wesley, 1997). Other JDBC books
appear regularly.
[ Add Comment ]
Client access from the Internet or
corporate intranets is a sure way to allow many users to access data and
resources
easily[74]. This
type of access is based on clients using the World Wide Web standards of
Hypertext Markup Language (HTML) and Hypertext Transfer Protocol (HTTP). The
Servlet API set abstracts a common solution framework for responding to HTTP
requests.
[ Add Comment ]
Traditionally, the way to handle a
problem such as allowing an Internet client to update a database is to create an
HTML page with text fields and a
“submit” button. The user types the appropriate information into the
text fields and presses the “submit” button. The data is submitted
along with a URL that tells the server what to do with the data by specifying
the location of a
Common
Gateway Interface (CGI) program that the server runs, providing the program with
the data as it is invoked. The CGI program is typically written in Perl, Python,
C, C++, or any language that can read from standard input and write to standard
output. That’s all that is provided by the Web server: the CGI program is
invoked, and standard streams (or, optionally for input, an environment
variable) are used for input and output. The CGI program is responsible for
everything else. First it looks at the data and decides whether the format is
correct. If not, the CGI program must produce HTML to describe the problem; this
page is handed to the Web server (via standard output from the CGI program),
which sends it back to the user. The user must usually back up a page and try
again. If the data is correct, the CGI program processes the data in an
appropriate way, perhaps adding it to a database. It must then produce an
appropriate HTML page for the Web server to return to the user.
[ Add Comment ]
It would be ideal to go to a completely
Java-based solution to this problem—an applet on the client side to
validate and send the data, and a servlet on the server side to receive and
process the data. Unfortunately, although applets are a proven technology with
plenty of support, they have been problematic to use on the Web because you
cannot rely on a particular version of Java being available on a client’s
Web browser; in fact, you can’t rely on a Web browser supporting Java at
all! In an intranet, you can require that certain support be available, which
allows a lot more flexibility in what you can do, but on the Web the safest
approach is to handle all the processing on the server side and deliver plain
HTML to the client. That way, no client will be denied the use of your site
because they do not have the proper software installed.
[ Add Comment ]
Because servlets provide an excellent
solution for server-side programming support, they are one of the most popular
reasons for moving to Java. Not only do they provide a framework that replaces
CGI programming (and eliminates a number of thorny CGI problems), but all your
code has the platform portability gained from using Java, and you have access to
all the Java APIs (except, of course, the ones that produce GUIs, like Swing).
[ Add Comment ]
The architecture of the servlet API is
that of a classic service provider with a service( ) method through
which all client requests will be sent by the servlet container software, and
life cycle methods init( ) and destroy( ), which are
called only when the servlet is loaded and unloaded (this happens rarely).
[ Add Comment ]
public interface Servlet {
  public void init(ServletConfig config)
    throws ServletException;
  public ServletConfig getServletConfig();
  public void service(ServletRequest req,
    ServletResponse res)
    throws ServletException, IOException;
  public String getServletInfo();
  public void destroy();
}
getServletConfig( )’s
sole purpose is to return a ServletConfig object that contains
initialization and startup parameters for this servlet.
getServletInfo( ) returns a string containing information about the
servlet, such as author, version, and copyright.
[ Add Comment ]
The GenericServlet class is a
shell implementation of this interface and is typically not used. The
HttpServlet class is an extension of GenericServlet and is
designed specifically to handle the HTTP protocol— HttpServlet is
the one that you’ll use most of the time.
[ Add Comment ]
The most convenient attribute of the
servlet API is the auxiliary objects that come along with the HttpServlet class
to support it. If you look at the service( ) method in the
Servlet interface, you’ll see it has two parameters:
ServletRequest and ServletResponse. With the HttpServlet
class these two object are extended for HTTP: HttpServletRequest and
HttpServletResponse. Here’s a simple example that shows the use of
HttpServletResponse:
//: c15:servlets:ServletsRule.java
import javax.servlet.*;
import javax.servlet.http.*;
import java.io.*;

public class ServletsRule extends HttpServlet {
  int i = 0; // Servlet "persistence"
  public void service(HttpServletRequest req,
  HttpServletResponse res) throws IOException {
    res.setContentType("text/html");
    PrintWriter out = res.getWriter();
    out.print("<HEAD><TITLE>");
    out.print("A server-side strategy");
    out.print("</TITLE></HEAD><BODY>");
    out.print("<h1>Servlets Rule! " + i++);
    out.print("</h1></BODY>");
    out.close();
  }
} ///:~
ServletsRule is about as simple as
a servlet can get. The servlet is initialized only once by calling its
init( ) method, on loading the servlet after the servlet container
is first booted up. When a client makes a request to a URL that happens to
represent a servlet, the servlet container intercepts this request and makes a
call to the service( ) method, after setting up the
HttpServletRequest and HttpServletResponse objects.
[ Add Comment ]
The main responsibility of the
service( ) method is to interact with the HTTP request that the
client has sent, and to build an HTTP response based on the attributes contained
within the request. ServletsRule only manipulates the response object
without looking at what the client may have sent.
[ Add Comment ]
After setting the content type of the
response (which must always be done before the Writer or OutputStream
is procured), the getWriter( ) method of the response object
produces a PrintWriter object, which is used for writing character-based
response data (alternatively, getOutputStream( ) produces an
OutputStream, used for binary response, which is only utilized in more
specialized solutions).
[ Add Comment ]
The rest of the program simply sends HTML
back to the client (it’s assumed you understand HTML, so that part is not
explained) as a sequence of Strings. However, notice the inclusion of the
“hit counter” represented by the variable i. This is
automatically converted to a String in the print( )
statement.
[ Add Comment ]
When you run the program, you’ll
notice that the value of i is retained between requests to the servlet.
This is an essential property of servlets: since only one servlet of a
particular class is loaded into the container, and it is never unloaded (unless
the servlet container is terminated, which is something that only normally
happens if you reboot the server computer), any fields of that servlet class
effectively become persistent objects! This means that you can effortlessly
maintain values between servlet requests, whereas with CGI you had to write
values to disk in order to preserve them, which required a fair amount of
fooling around to get it right, and resulted in a non-cross-platform solution.
[ Add Comment ]
Of course, sometimes the Web server, and
thus the servlet container, must be rebooted as part of maintenance or during a
power failure. To avoid losing any persistent information, the servlet’s
init( ) and destroy( ) methods are automatically called
whenever the servlet is loaded or unloaded, giving you the opportunity to save
data during shutdown, and restore it after rebooting. The servlet container
calls the destroy( ) method as it is terminating itself, so you
always get an opportunity to save valuable data as long as the server machine is
configured in an intelligent way.
[ Add Comment ]
There’s one other issue when using
HttpServlet. This class provides doGet( ) and
doPost( ) methods that differentiate between a CGI “GET”
submission from the client, and a CGI “POST.” GET and POST vary only
in the details of the way that they submit the data, which is something that I
personally would prefer to ignore. However, most published information that
I’ve seen seems to favor the creation of separate doGet( ) and
doPost( ) methods instead of a single generic service( )
method, which handles both cases. This favoritism seems quite common, but
I’ve never seen it explained in a fashion that leads me to believe that
it’s anything more than inertia from CGI programmers who are used to
paying attention to whether a GET or POST is being used. So in the spirit of
“doing the simplest thing that could possibly
work,”[75] I
will just use the service( ) method in these examples, and let it
care about GETs vs. POSTs. However, keep in mind that I might have missed
something and so there may in fact be a good reason to use doGet( )
and doPost( ) instead.
[ Add Comment ]
Whenever a form is submitted to a
servlet, the HttpServletRequest comes preloaded with all the form data,
stored as key-value pairs. If you know the names of the fields, you can just use
them directly with the getParameter( ) method to look up the values.
You can also get an Enumeration (the old form of the Iterator) to
the field names, as is shown in the following example. This example also
demonstrates how a single servlet can be used to produce the page that contains
the form, and to respond to the page (a better solution will be seen later, with
JSPs). If the Enumeration is empty, there are no fields; this means no
form was submitted. In this case, the form is produced, and the submit button
will re-call the same servlet. If fields do exist, however, they are
displayed.
//: c15:servlets:EchoForm.java
// Dumps the name-value pairs of any HTML form
import javax.servlet.*;
import javax.servlet.http.*;
import java.io.*;
import java.util.*;

public class EchoForm extends HttpServlet {
  public void service(HttpServletRequest req,
    HttpServletResponse res) throws IOException {
    res.setContentType("text/html");
    PrintWriter out = res.getWriter();
    Enumeration flds = req.getParameterNames();
    if(!flds.hasMoreElements()) {
      // No form submitted -- create one:
      out.print("<html>");
      out.print("<form method=\"POST\"" +
        " action=\"EchoForm\">");
      for(int i = 0; i < 10; i++)
        out.print("<b>Field" + i + "</b> " +
          "<input type=\"text\""+
          " size=\"20\" name=\"Field" + i +
          "\" value=\"Value" + i + "\"><br>");
      out.print("<INPUT TYPE=submit name=submit"+
        " Value=\"Submit\"></form></html>");
    } else {
      out.print("<h1>Your form contained:</h1>");
      while(flds.hasMoreElements()) {
        String field= (String)flds.nextElement();
        String value= req.getParameter(field);
        out.print(field + " = " + value+ "<br>");
      }
    }
    out.close();
  }
} ///:~
One drawback you’ll notice here is
that Java does not seem to be designed with string processing in mind—the
formatting of the return page is painful because of line breaks, escaping quote
marks, and the “+” signs necessary to build String objects.
With a larger HTML page it becomes unreasonable to code it directly into Java.
One solution is to keep the page as a separate text file, then open it and hand
it to the Web server. If you have to perform any kind of substitution to the
contents of the page, it’s not much better since Java has treated string
processing so poorly. In these cases you’re probably better off using a
more appropriate solution (Python would be my choice; there’s a version
that embeds itself in Java called JPython) to generate the response page.
[ Add Comment ]
The servlet container has a pool of
threads that it will dispatch to handle client requests. It is quite likely that
two clients arriving at the same time could be processing through your
service( ) at the same time. Therefore the service( )
method must written in a thread-safe manner. Any access to common resources
(files, databases) will need to be guarded by using the synchronized
keyword.
[ Add Comment ]
The following simple example puts a
synchronized clause around the thread’s sleep( )
method. This will block all other threads until the allotted time (five seconds)
is all used up. When testing this you should start several browser instances and
hit this servlet as quickly as possible in each one—you’ll see that
each one has to wait until its turn comes up.
//: c15:servlets:ThreadServlet.java
import javax.servlet.*;
import javax.servlet.http.*;
import java.io.*;

public class ThreadServlet extends HttpServlet {
  int i;
  public void service(HttpServletRequest req,
    HttpServletResponse res) throws IOException {
    res.setContentType("text/html");
    PrintWriter out = res.getWriter();
    synchronized(this) {
      try {
        Thread.currentThread().sleep(5000);
      } catch(InterruptedException e) {
        System.err.println("Interrupted");
      }
    }
    out.print("<h1>Finished " + i++ + "</h1>");
    out.close();
  }
} ///:~
It is also possible to synchronize the
entire servlet by putting the synchronized keyword in front of the
service( ) method. In fact, the only reason to use the
synchronized clause instead is if the critical section is in an execution
path that might not get executed. In that case, you might as well avoid the
overhead of synchronizing every time by using a synchronized clause.
Otherwise, all the threads will have to wait anyway so you might as well
synchronize the whole method.
[ Add Comment ]
HTTP is a “sessionless”
protocol, so you cannot tell from one server hit to another if you’ve got
the same person repeatedly querying your site, or if it is a completely
different person. A great deal of effort has gone into mechanisms that will
allow Web developers to track sessions. Companies could not do e-commerce
without keeping track of a client and the items they have put into their
shopping cart, for example.
[ Add Comment ]
There are several methods of session
tracking, but the most common method is with persistent “cookies,”
which are an integral part of the Internet standards. The HTTP Working Group of
the Internet Engineering Task Force has written cookies
into the official standard in RFC 2109 (ds.internic.net/rfc/rfc2109.txt
or check www.cookiecentral.com).
[ Add Comment ]
A cookie is nothing more than a small
piece of information sent by a Web server to a browser. The browser stores the
cookie on the local disk, and whenever another call is made to the URL that the
cookie is associated with, the cookie is quietly sent along with the call, thus
providing the desired information back to that server (generally, providing some
way that the server can be told that it’s you calling). Clients can,
however, turn off the browser’s ability to accept cookies. If your site
must track a client who has turned off cookies, then another method of session
tracking (URL rewriting or hidden form fields) must be incorporated by hand,
since the session tracking capabilities built into the servlet API are designed
around cookies.
[ Add Comment ]
The servlet API (version 2.0 and up)
provides the Cookie class. This class incorporates all the HTTP header
details and allows the setting of various cookie attributes. Using the cookie is
simply a matter of adding it to the response object. The constructor takes a
cookie name as the first argument and a value as the second. Cookies are added
to the response object before you send any content.
Cookie oreo = new Cookie("TIJava", "2000");
res.addCookie(oreocookie);
Cookies are recovered by calling the
getCookies( ) method of the HttpServletRequest object, which
returns an array of cookie objects.
Cookie[] cookies = req.getCookies();
You can then call getValue( )
for each cookie, to produce a String containing the cookie contents. In
the above example, getValue("TIJava") will produce a String
containing “2000.”
[ Add Comment ]
A session is one or more page requests by
a client to a Web site during a defined period of time. If you buy groceries
online, for example, you want a session to be confined to the period from when
you first add an item to “my shopping cart” to the point where you
check out. Each item you add to the shopping cart will result in a new HTTP
connection, which has no knowledge of previous connections or items in the
shopping cart. To compensate for this lack of information, the mechanics
supplied by the cookie specification allow your servlet to perform session
tracking.
[ Add Comment ]
A servlet Session object lives on
the server side of the communication channel; its goal is to capture useful data
about this client as the client moves through and interacts with your Web site.
This data may be pertinent for the present session, such as items in the
shopping cart, or it may be data such as authentication information that was
entered when the client first entered your Web site, and which should not have
to be reentered during a particular set of transactions.
[ Add Comment ]
The Session class of the servlet
API uses the Cookie class to do its work. However, all the Session
object needs is some kind of unique identifier stored on the client and passed
to the server. Web sites may also use the other types of session tracking but
these mechanisms will be more difficult to implement as they are not
encapsulated into the servlet API (that is, you must write them by hand to deal
with the situation when the client has disabled cookies).
[ Add Comment ]
Here’s an example that implements
session tracking with the servlet API:
//: c15:servlets:SessionPeek.java
// Using the HttpSession class.
import java.io.*;
import java.util.*;
import javax.servlet.*;
import javax.servlet.http.*;

public class SessionPeek extends HttpServlet {
  public void service(HttpServletRequest req,
  HttpServletResponse res)
  throws ServletException, IOException {
    // Retrieve Session Object before any
    // output is sent to the client.
    HttpSession session = req.getSession();
    res.setContentType("text/html");
    PrintWriter out = res.getWriter();
    out.println("<HEAD><TITLE> SessionPeek ");
    out.println(" </TITLE></HEAD><BODY>");
    out.println("<h1> SessionPeek </h1>");
    // A simple hit counter for this session.
    Integer ival = (Integer)
      session.getAttribute("sesspeek.cntr");
    if(ival==null)
      ival = new Integer(1);
    else
      ival = new Integer(ival.intValue() + 1);
    session.setAttribute("sesspeek.cntr", ival);
    out.println("You have hit this page <b>"
      + ival + "</b> times.<p>");
    out.println("<h2>");
    out.println("Saved Session Data </h2>");
    // Loop through all data in the session:
    Enumeration sesNames =
      session.getAttributeNames();
    while(sesNames.hasMoreElements()) {
      String name =
        sesNames.nextElement().toString();
      Object value = session.getAttribute(name);
      out.println(name + " = " + value + "<br>");
    }
    out.println("<h3> Session Statistics </h3>");
    out.println("Session ID: "
      + session.getId() + "<br>");
    out.println("New Session: " + session.isNew()
      + "<br>");
    out.println("Creation Time: "
      + session.getCreationTime());
    out.println("<I>(" +
      new Date(session.getCreationTime())
      + ")</I><br>");
    out.println("Last Accessed Time: " +
      session.getLastAccessedTime());
    out.println("<I>(" +
      new Date(session.getLastAccessedTime())
      + ")</I><br>");
    out.println("Session Inactive Interval: "
      + session.getMaxInactiveInterval());
    out.println("Session ID in Request: "
      + req.getRequestedSessionId() + "<br>");
    out.println("Is session id from Cookie: "
      + req.isRequestedSessionIdFromCookie()
      + "<br>");
    out.println("Is session id from URL: "
      + req.isRequestedSessionIdFromURL()
      + "<br>");
    out.println("Is session id valid: "
      + req.isRequestedSessionIdValid()
      + "<br>");
    out.println("</BODY>");
    out.close();
  }
  public String getServletInfo() {
    return "A session tracking servlet";
  }
} ///:~
Inside the service( ) method,
getSession( ) is called for the request object, which returns the
Session object associated with this request. The Session object
does not travel across the network, but instead it lives on the server and is
associated with a client and its requests.
[ Add Comment ]
getSession( ) comes in two
versions: no parameter, as used here, and getSession(boolean).
getSession(true) is equivalent to getSession( ). The only
reason for the boolean is to state whether you want the session object
created if it is not found. getSession(true) is the most likely call,
hence getSession( ).
[ Add Comment ]
The Session object, if it is not
new, will give us details about the client from previous visits. If the
Session object is new then the program will start to gather information
about this client’s activities on this visit. Capturing this client
information is done through the setAttribute( ) and
getAttribute( ) methods of the session object.
[ Add Comment ]
java.lang.Object getAttribute(java.lang.String)
void setAttribute(java.lang.String name,
                  java.lang.Object value)
The Session object uses a simple
name-value pairing for loading information. The name is a String, and the
value can be any object derived from java.lang.Object. SessionPeek
keeps track of how many times the client has been back during this session. This
is done with an Integer object named sesspeek.cntr. If the name is
not found an Integer is created with value of one, otherwise an
Integer is created with the incremented value of the previously held
Integer. The new Integer is placed into the Session object.
If you use same key in a setAttribute( ) call, then the new object
overwrites the old one. The incremented counter is used to display the number of
times that the client has visited during this session.
[ Add Comment ]
getAttributeNames( ) is
related to getAttribute( ) and setAttribute( ); it
returns an enumeration of the names of the objects that are bound to the
Session object. A while loop in SessionPeek shows this
method in action.
[ Add Comment ]
You may wonder how long a Session
object hangs around. The answer depends on the servlet container you are using;
they usually default to 30 minutes (1800 seconds), which is what you should see
from the ServletPeek call to getMaxInactiveInterval( ). Tests
seem to produce mixed results between servlet containers. Sometimes the
Session object can hang around overnight, but I have never seen a case
where the Session object disappears in less than the time specified by
the inactive interval. You can try this by setting the inactive interval with
setMaxInactiveInterval( ) to 5 seconds and see if your
Session object hangs around or if it is cleaned up at the appropriate
time. This may be an attribute you will want to investigate while choosing a
servlet container.
[ Add Comment ]
If you are not already working with an
application server that handles Sun’s servlet and JSP technologies for
you, you may download the Tomcat
implementation of Java servlets and JSPs, which is a free, open-source
implementation of servlets, and is the official reference implementation
sanctioned by Sun. It can be found at jakarta.apache.org.
[ Add Comment ]
Follow the instructions for installing
the Tomcat implementation, then edit the server.xml file to point to the
location in your directory tree where your servlets will be placed. Once you
start up the Tomcat program you can test your servlet programs.
[ Add Comment ]
This has only been a brief introduction
to servlets; there are entire books on the subject. However, this introduction
should give you enough ideas to get you started. In addition, many of the ideas
in the next section are backward compatible with servlets.
[ Add Comment ]
Java Server Pages (JSP)
is a standard Java extension that is defined on top of the servlet Extensions.
The goal of JSPs is the simplified creation and management of dynamic Web pages.
[ Add Comment ]
The previously mentioned, freely
available Tomcat reference implementation from jakarta.apache.org
automatically supports JSPs.
[ Add Comment ]
JSPs allow you to combine the HTML of a
Web page with pieces of Java code in the same document. The Java code is
surrounded by special tags that tell the JSP container that it should use the
code to generate a servlet, or part of one. The benefit of JSPs is that you can
maintain a single document that represents both the page and the Java code that
enables it. The downside is that the maintainer of the JSP page must be skilled
in both HTML and Java (however, GUI builder environments for JSPs should be
forthcoming).
[ Add Comment ]
The first time a JSP is loaded by the JSP
container (which is typically associated with, or even part of, a Web server),
the servlet code necessary to fulfill the JSP tags is automatically generated,
compiled, and loaded into the servlet container. The static portions of the HTML
page are produced by sending static String objects to
write( ). The dynamic portions are included directly into the
servlet.
[ Add Comment ]
From then on, as long as the JSP source
for the page is not modified, it behaves as if it were a static HTML page with
associated servlets (all the HTML code is actually generated by the servlet,
however). If you modify the source code for the JSP, it is automatically
recompiled and reloaded the next time that page is requested. Of course, because
of all this dynamism you’ll see a slow response for the first-time access
to a JSP. However, since a JSP is usually used much more than it is changed, you
will normally not be affected by this delay.
[ Add Comment ]
The structure of a JSP page is a cross
between a servlet and an HTML page. The JSP tags begin and end with angle
brackets, just like HTML tags, but the tags also include percent signs, so all
JSP tags are denoted by
<% JSP code here %>
The leading percent sign may be followed
by other characters that determine the precise type of JSP code in the tag.
[ Add Comment ]
Here’s an extremely simple JSP
example that uses a standard Java library call to get the current time in
milliseconds, which is then divided by 1000 to produce the time in seconds.
Since a JSP expression (the <%= ) is used, the result of the
calculation is coerced into a String and placed on the generated Web
page:
//:! c15:jsp:ShowSeconds.jsp
<html><body>
<H1>The time in seconds is:
<%= System.currentTimeMillis()/1000 %></H1>
</body></html>
///:~
In the JSP examples in this book, the
first and last lines are not included in the actual code file that is extracted
and placed in the book’s source-code tree.
[ Add Comment ]
When the client creates a request for the
JSP page, the Web server must have been configured to relay the request to the
JSP container, which then invokes the page. As mentioned above, the first time
the page is invoked, the components specified by the page are generated and
compiled by the JSP container as one or more servlets. In the above example, the
servlet will contain code to configure the HttpServletResponse object,
produce a PrintWriter object (which is always named out), and then
turn the time calculation into a String which is sent to out. As
you can see, all this is accomplished with a very succinct statement, but the
average HTML programmer/Web designer will not have the skills to write such
code.
[ Add Comment ]
Servlets include classes that provide
convenient utilities, such as HttpServletRequest,
HttpServletResponse, Session, etc. Objects of these classes are
built into the JSP specification and automatically available for use in your JSP
without writing any extra lines of code. The implicit objects in a JSP are
detailed in the table below.
|
Implicit variable |
Of Type
(javax.servlet) |
Description |
Scope |
|
request |
protocol dependent subtype of
HttpServletRequest |
The request that triggers the service
invocation. |
request |
|
response |
protocol dependent subtype of
HttpServletResponse |
The response to the
request. |
page |
|
pageContext |
jsp.PageContext |
The page context encapsulates
implementation-dependent features and provides convenience methods and namespace
access for this JSP. |
page |
|
session |
Protocol dependent subtype of
http.HttpSession |
The session object created for the
requesting client. See servlet Session object. |
session |
|
application |
ServletContext |
The servlet context obtained from the
servlet configuration object (e.g., getServletConfig(),
getContext( ). |
app |
|
out |
jsp.JspWriter |
The object that writes into the output
stream. |
page |
|
config |
ServletConfig |
The ServletConfig for this
JSP. |
page |
|
page |
java.lang.Object |
The instance of this page’s
implementation class processing the current request. |
page |
The scope of each object can vary
significantly. For example, the session object has a scope which exceeds
that of a page, as it many span several client requests and pages. The
application object can provide services to a group of JSP pages that
together represent a Web
application.
Directives are messages to the JSP
container and are denoted by the “@”:
[ Add Comment ]
<%@ directive {attr="value"}* %>Directives do not send anything to the
out stream, but they are important in setting up your JSP page’s
attributes and dependencies with the JSP container. For example, the line:
[ Add Comment ]
<%@ page language="java" %>
says that the scripting language being
used within the JSP page is Java. In fact, the JSP specification only
describes the semantics of scripts for the language attribute equal to
“Java.” The intent of this directive is to build flexibility into
the JSP technology. In the future, if you were to choose another language, say
Python (a good scripting choice), then that language would have to support the
Java Run-time Environment by exposing the Java technology object model to the
scripting environment, especially the implicit variables defined above,
JavaBeans properties, and public methods.
[ Add Comment ]
The most important directive is the page
directive. It defines a number of page dependent attributes and communicates
these attributes to the JSP container. These attributes include:
language, extends, import, session, buffer,
autoFlush, isThreadSafe, info and errorPage. For
example:
<%@ page session=”true” import=”java.util.*” %>
This line first indicates that the page
requires participation in an HTTP session. Since we have not set the language
directive the JSP container defaults to using Java and the implicit script
language variable named session is of type
javax.servlet.http.HttpSession. If the directive had been false then the
implicit variable session would be unavailable. If the session
variable is not specified, then it defaults to “true.”
[ Add Comment ]
The import attribute describes the
types that are available to the scripting environment. This attribute is used
just as it would be in the Java programming language, i.e., a comma-separated
list of ordinary import expressions. This list is imported by the
translated JSP page implementation and is available to the scripting
environment. Again, this is currently only defined when the value of the
language directive is “java.”
[ Add Comment ]
Once the directives have been used to set
up the scripting environment you can utilize the scripting language elements.
JSP 1.1 has three scripting language elements—declarations,
scriptlets, and expressions. A declaration will declare elements,
a scriptlet is a statement fragment, and an expression is a complete language
expression. In JSP each scripting element begins with a
“<%”. The syntax for each is:
<%! declaration %>
<%  scriptlet   %>
<%= expression  %>
White space is optional after
“<%!”, “<%”, “<%=”, and before
“%>.”
[ Add Comment ]
All these tags are based upon XML; you
could even say that a JSP page can be mapped to a XML document. The XML
equivalent syntax for the scripting elements above would be:
<jsp:declaration> declaration </jsp:declaration>
<jsp:scriptlet>   scriptlet   </jsp:scriptlet>
<jsp:expression>  expression  </jsp:expression>
In addition, there are two types of
comments:
<%-- jsp comment --%>
<!-- html comment -->
The first form allows you to add comments
to JSP source pages that will not appear in any form in the HTML that is sent to
the client. Of course, the second form of comment is not specific to
JSPs—it’s just an ordinary HTML comment. What’s interesting is
that you can insert JSP code inside an HTML comment and the comment will be
produced in the resulting page, including the result from the JSP code.
[ Add Comment ]
Declarations are used to declare
variables and methods in the scripting language (currently Java only) used in a
JSP page. The declaration must be a complete Java statement and cannot produce
any output in the out stream. In the Hello.jsp example below, the
declarations for the variables loadTime, loadDate and
hitCount are all complete Java statements that declare and initialize new
variables.
//:! c15:jsp:Hello.jsp
<%-- This JSP comment will not appear in the
generated html --%>
<%-- This is a JSP directive: --%>
<%@ page import="java.util.*" %>
<%-- These are declarations: --%>
<%!
    long loadTime= System.currentTimeMillis();
    Date loadDate = new Date();
    int hitCount = 0;
%>
<html><body>
<%-- The next several lines are the result of a
JSP expression inserted in the generated html;
the '=' indicates a JSP expression --%>
<H1>This page was loaded at <%= loadDate %> </H1>
<H1>Hello, world! It's <%= new Date() %></H1>
<H2>Here's an object: <%= new Object() %></H2>
<H2>This page has been up
<%= (System.currentTimeMillis()-loadTime)/1000 %>
seconds</H2>
<H3>Page has been accessed <%= ++hitCount %>
times since <%= loadDate %></H3>
<%-- A "scriptlet" that writes to the server
console and to the client page.
Note that the ';' is required: --%>
<%
   System.out.println("Goodbye");
   out.println("Cheerio");
%>
</body></html>
///:~
When you run this program you’ll
see that the variables loadTime, loadDate and hitCount hold
their values between hits to the page, so they are clearly fields and not local
variables.
[ Add Comment ]
At the end of the example is a scriptlet
that writes “Goodbye” to the Web server console and
“Cheerio” to the implicit JspWriter object out.
Scriptlets can contain any code fragments that are valid Java statements.
Scriptlets are executed at request-processing time. When all the scriptlet
fragments in a given JSP are combined in the order they appear in the JSP page,
they should yield a valid statement as defined by the Java programming language.
Whether or not they produce any output into the out stream depends upon
the code in the scriptlet. You should be aware that scriptlets can produce side
effects by modifying the objects that are visible to them.
[ Add Comment ]
JSP expressions can found intermingled
with the HTML in the middle section of Hello.jsp. Expressions must be
complete Java statements, which are evaluated, coerced to a String, and
sent to out. If the result of the expression cannot be coerced to a
String then a ClassCastException is thrown.
[ Add Comment ]
The following example is similar to one
shown earlier in the servlet section. The first time you hit the page it detects
that you have no fields and returns a page containing a form, using the same
code as in the servlet example, but in JSP format. When you submit the form with
the filled-in fields to the same JSP URL, it detects the fields and displays
them. This is a nice technique because it allows you to have both the page
containing the form for the user to fill out and the response code for that page
in a single file, thus making it easier to create and maintain.
//:! c15:jsp:DisplayFormData.jsp
<%-- Fetching the data from an HTML form. --%>
<%-- This JSP also generates the form. --%>
<%@ page import="java.util.*" %>
<html><body>
<H1>DisplayFormData</H1><H3>
<%
  Enumeration flds = request.getParameterNames();
  if(!flds.hasMoreElements()) { // No fields %>
    <form method="POST"
    action="DisplayFormData.jsp">
<%  for(int i = 0; i < 10; i++) {  %>
      Field<%=i%>: <input type="text" size="20"
      name="Field<%=i%>" value="Value<%=i%>"><br>
<%  } %>
    <INPUT TYPE=submit name=submit
    value="Submit"></form>
<%} else {
    while(flds.hasMoreElements()) {
      String field = (String)flds.nextElement();
      String value = request.getParameter(field);
%>
      <li><%= field %> = <%= value %></li>
<%  }
  } %>
</H3></body></html>
///:~
The most interesting feature of this
example is that it demonstrates how scriptlet code can be intermixed with HTML
code, even to the point of generating HTML within a Java for loop. This
is especially convenient for building any kind of form where repetitive HTML
code would otherwise be required.
[ Add Comment ]
By poking around in the HTML
documentation for servlets and JSPs, you will find features that report
information about the servlet or JSP that is currently running. The following
example displays a few of these pieces of data.
//:! c15:jsp:PageContext.jsp
<%--Viewing the attributes in the pageContext--%>
<%-- Note that you can include any amount of code
inside the scriptlet tags --%>
<%@ page import="java.util.*" %>
<html><body>
Servlet Name: <%= config.getServletName() %><br>
Servlet container supports servlet version:
<% out.print(application.getMajorVersion() + "."
+ application.getMinorVersion()); %><br>
<%
  session.setAttribute("My dog", "Ralph");
  for(int scope = 1; scope <= 4; scope++) {  %>
    <H3>Scope: <%= scope %> </H3>
<%  Enumeration e =
      pageContext.getAttributeNamesInScope(scope);
    while(e.hasMoreElements()) {
      out.println("\t<li>" +
        e.nextElement() + "</li>");
    }
  }
%>
</body></html>
///:~
This example also shows the use of both
embedded HTML and writing to out in order to output to the resulting HTML
page.
[ Add Comment ]
The first piece of information produced
is the name of the servlet, which will probably just be “JSP” but it
depends on your implementation. You can also discover the current version of the
servlet container by using the application object. Finally, after setting a
session attribute, the “attribute names” in a particular scope are
displayed. You don’t use the scopes very much in most JSP programming;
they were just shown here to add interest to the example. There are four
attribute scopes, as follows: The page scope (scope 1), the request
scope (scope 2), the session scope (scope 3—here, the only
element available in session scope is “My dog,” added right before
the for loop), and the application scope (scope 4), based upon the
ServletContext object. There is one ServletContext per “Web
application” per Java Virtual Machine. (A “Web application” is
a collection of servlets and content installed under a specific subset of the
server’s URL namespace such as /catalog. This is generally set up using a
configuration file.) At the application scope you will see objects that
represent paths for the working directory and temporary directory.
[ Add Comment ]
Sessions were introduced in the prior
section on servlets, and are also available within JSPs. The following example
exercises the session object and allows you to manipulate the amount of
time before the session becomes invalid.
//:! c15:jsp:SessionObject.jsp
<%--Getting and setting session object values--%>
<html><body>
<H1>Session id: <%= session.getId() %></H1>
<H3><li>This session was created at
<%= session.getCreationTime() %></li></H1>
<H3><li>Old MaxInactiveInterval =
  <%= session.getMaxInactiveInterval() %></li>
<% session.setMaxInactiveInterval(5); %>
<li>New MaxInactiveInterval=
  <%= session.getMaxInactiveInterval() %></li>
</H3>
<H2>If the session object "My dog" is
still around, this value will be non-null:<H2>
<H3><li>Session value for "My dog" =
<%= session.getAttribute("My dog") %></li></H3>
<%-- Now add the session object "My dog" --%>
<% session.setAttribute("My dog",
                    new String("Ralph")); %>
<H1>My dog's name is
<%= session.getAttribute("My dog") %></H1>
<%-- See if "My dog" wanders to another form --%>
<FORM TYPE=POST ACTION=SessionObject2.jsp>
<INPUT TYPE=submit name=submit
Value="Invalidate"></FORM>
<FORM TYPE=POST ACTION=SessionObject3.jsp>
<INPUT TYPE=submit name=submit
Value="Keep Around"></FORM>
</body></html>
///:~
The session object is provided by
default so it is available without any extra coding. The calls to
getID( ), getCreationTime( ) and
getMaxInactiveInterval( ) are used to display information about this
session object.
[ Add Comment ]
When you first bring up this session you
will see a MaxInactiveInterval of, for example, 1800 seconds (30
minutes). This will depend on the way your JSP/servlet container is configured.
The MaxInactiveInterval is shortened to 5 seconds to make things
interesting. If you refresh the page before the 5 second interval expires, then
you’ll see:
Session value for "My dog" = Ralph
But if you wait longer than that,
“Ralph” will become null.
[ Add Comment ]
To see how the session information can be
carried through to other pages, and also to see the effect of invalidating a
session object versus just letting it expire, two other JSPs are created. The
first one (reached by pressing the “invalidate” button in
SessionObject.jsp) reads the session information and then explicitly
invalidates that session:
//:! c15:jsp:SessionObject2.jsp
<%--The session object carries through--%>
<html><body>
<H1>Session id: <%= session.getId() %></H1>
<H1>Session value for "My dog"
<%= session.getValue("My dog") %></H1>
<% session.invalidate(); %>
</body></html>
///:~
To experiment with this, refresh
SessionObject.jsp, then immediately click the “invalidate”
button to bring you to SessionObject2.jsp. At this point you will still
see “Ralph,” and right away (before the 5-second interval has
expired), refresh SessionObject2.jsp to see that the session has been
forcefully invalidated and “Ralph” has disappeared.
[ Add Comment ]
If you go back to
SessionObject.jsp, refresh the page so you have a new 5-second interval,
then press the “Keep Around” button, it will take you to the
following page, SessionObject3.jsp, which does NOT invalidate the
session:
//:! c15:jsp:SessionObject3.jsp
<%--The session object carries through--%>
<html><body>
<H1>Session id: <%= session.getId() %></H1>
<H1>Session value for "My dog"
<%= session.getValue("My dog") %></H1>
<FORM TYPE=POST ACTION=SessionObject.jsp>
<INPUT TYPE=submit name=submit Value="Return">
</FORM>
</body></html>
///:~
Because this page doesn’t
invalidate the session, “Ralph” will hang around as long as you keep
refreshing the page before the 5 second time interval expires. This is not
unlike a “Tomagotchi” pet—as long as you play with
“Ralph” he will stick around, otherwise he expires.
[ Add Comment ]
Cookies were introduced in the prior section on servlets. Once again, the brevity of JSPs makes playing with cookies much simpler here than when using servlets. The following example shows this by fetching the cookies that come with the request, reading and modifying their maximum ages (expiration dates) and attaching a new cookie to the outgoing response:
//:! c15:jsp:Cookies.jsp
<%--This program has different behaviors under
 different browsers! --%>
<html><body>
<H1>Session id: <%= session.getId() %></H1>
<%
Cookie[] cookies = request.getCookies();
for(int i = 0; i < cookies.length; i++) { %>
  Cookie name: <%= cookies[i].getName() %> <br>
  value: <%= cookies[i].getValue() %><br>
  Old max age in seconds:
  <%= cookies[i].getMaxAge() %><br>
  <% cookies[i].setMaxAge(5); %>
  New max age in seconds:
  <%= cookies[i].getMaxAge() %><br>
<% } %>
<%! int count = 0; int dcount = 0; %>
<% response.addCookie(new Cookie(
    "Bob" + count++, "Dog" + dcount++)); %>
</body></html>
///:~
Since each browser stores cookies in its
own way, you may see different behaviors with different browsers (not
reassuring, but it might be some kind of bug that could be fixed by the time you
read this). Also, you may experience different results if you shut down the
browser and restart it, rather than just visiting a different page and then
returning to Cookies.jsp. Note that using session objects seems to be
more robust than directly using cookies.
[ Add Comment ]
After displaying the session identifier,
each cookie in the array of cookies that comes in with the request object
is displayed, along with its maximum age. The maximum age is changed and
displayed again to verify the new value, then a new cookie is added to the
response. However, your browser may seem to ignore the maximum age; it’s
worth playing with this program and modifying the maximum age value to see the
behavior under different browsers.
[ Add Comment ]
This section has only been a brief
coverage of JSPs, and yet even with what was covered here (along with the Java
you’ve learned in the rest of the book, and your own knowledge of HTML)
you can begin to write sophisticated web pages via JSPs. The JSP syntax
isn’t meant to be particularly deep or complicated, so if you understand
what was presented in this section you’re ready to be productive with
JSPs. You can find further information in most current books on servlets, or at
java.sun.com.
[ Add Comment ]
It’s especially nice to have JSPs
available, even if your goal is only to produce servlets. You’ll discover
that if you have a question about the behavior of a servlet feature, it’s
much easier and faster to write a JSP test program to answer that question than
it is to write a servlet. Part of the benefit comes from having to write less
code and being able to mix the display HTML in with the Java code, but the
leverage becomes especially obvious when you see that the JSP Container handles
all the recompilation and reloading of the JSP for you whenever the source is
changed.
[ Add Comment ]
As terrific as JSPs are, however,
it’s worth keeping in mind that JSP creation requires a higher level of
skill than just programming in Java or just creating Web pages. In addition,
debugging a broken JSP page is not as easy as debugging a Java program, as
(currently) the error messages are more obscure. This should change as
development systems improve, but we may also see other technologies built on top
of Java and the Web that are better adapted to the skills of the web site
designer.
[ Add Comment ]
Traditional approaches to executing code
on other machines across a network have been confusing as well as tedious and
error-prone to implement. The nicest way to think about this problem is that
some object happens to live on another machine, and that you can send a message
to the remote object and get a result as if the object lived on your local
machine. This simplification is exactly what Java
Remote Method Invocation
(RMI) allows you to do. This section walks you through the steps necessary to
create your own RMI objects.
[ Add Comment ]
RMI makes heavy use of interfaces. When
you want to create a remote object, you mask the underlying implementation by
passing around an interface. Thus, when the client gets a reference to a remote
object, what they really get is an interface reference, which happens to
connect to some local stub code that talks across the network. But you
don’t think about this, you just send messages via your interface
reference.
[ Add Comment ]
Here’s a simple
remote interface that represents an accurate time service:
[ Add Comment ]
//: c15:rmi:PerfectTimeI.java
// The PerfectTime remote interface.
package c15.rmi;
import java.rmi.*;

public interface PerfectTimeI extends Remote {
  long getPerfectTime() throws RemoteException;
} ///:~
It looks like any other interface except
that it extends Remote and all of its methods throw
RemoteException. Remember that all the methods of an
interface and all of its methods are automatically
public.
[ Add Comment ]
The server must contain a class that
extends
UnicastRemoteObject and
implements the remote interface. This class can also have additional methods,
but only the methods in the remote interface are available to the client, of
course, since the client will get only a reference to the interface, not the
class that implements it.
[ Add Comment ]
You must explicitly define the
constructor for the remote object even if you’re only defining a default
constructor that calls the base-class constructor. You must write it out since
it must throw RemoteException.
[ Add Comment ]
Here’s the implementation of the
remote interface PerfectTimeI:
//: c15:rmi:PerfectTime.java
// The implementation of
// the PerfectTime remote object.
package c15.rmi;
import java.rmi.*;
import java.rmi.server.*;
import java.rmi.registry.*;
import java.net.*;

public class PerfectTime
    extends UnicastRemoteObject
    implements PerfectTimeI {
  // Implementation of the interface:
  public long getPerfectTime()
      throws RemoteException {
    return System.currentTimeMillis();
  }
  // Must implement constructor
  // to throw RemoteException:
  public PerfectTime() throws RemoteException {
    // super(); // Called automatically
  }
  // Registration for RMI serving. Throw
  // exceptions out to the console.
  public static void main(String[] args)
  throws Exception {
    System.setSecurityManager(
    new RMISecurityManager());
    PerfectTime pt = new PerfectTime();
    Naming.bind(
      "//peppy:2005/PerfectTime", pt);
    System.out.println("Ready to do time");
  }
} ///:~
Here, main( ) handles all the
details of setting up the server. When you’re serving RMI objects, at some
point in your program you must:
[ Add Comment ]
Here, you see a call to the static
method
Naming.bind( ).
However, this call requires that the registry be running as a separate process
on the computer. The name of the registry server is
rmiregistry, and under
32-bit Windows you say:
[ Add Comment ]
start rmiregistry
to start it in the background. On Unix,
the command is:
rmiregistry &
Like many network programs, the
rmiregistry is located at the IP address of whatever machine started it
up, but it must also be listening at a port. If you invoke the
rmiregistry as above, with no argument, the registry’s port will
default to 1099. If you want it to be at some other port, you add an argument on
the command line to specify the port. For this example, the port is located at
2005, so the rmiregistry should be started like this under 32-bit
Windows:
[ Add Comment ]
start rmiregistry 2005
or for Unix:
rmiregistry 2005 &
The information about the port must also
be given to the bind( ) command, as well as the IP address of the
machine where the registry is located. But this brings up what can be a
frustrating problem if you’re expecting to test RMI programs locally the
way the network programs have been tested so far in this chapter. In the JDK
1.1.1 release, there are a couple of
problems:[76]
[ Add Comment ]
With
all this in mind, the bind( ) command becomes:
[ Add Comment ]
Naming.bind("//peppy:2005/PerfectTime", pt);If you are using the default port 1099,
you don’t need to specify a port, so you could say:
[ Add Comment ]
Naming.bind("//peppy/PerfectTime", pt);You should be able to perform local
testing by leaving off the IP address and using only the identifier:
[ Add Comment ]
Naming.bind("PerfectTime", pt);The name for the service is arbitrary; it
happens to be PerfectTime here, just like the name of the class, but you could
call it anything you want. The important thing is that it’s a unique name
in the registry that the client knows to look for to procure the remote object.
If the name is already in the registry, you’ll get an
AlreadyBoundException. To
prevent this, you can always use
rebind( )
instead of bind( ), since rebind( ) either adds a new
entry or replaces the one that’s already there.
[ Add Comment ]
Even though main( ) exits,
your object has been created and registered so it’s kept alive by the
registry, waiting for a client to come along and request it. As long as the
rmiregistry is running and you don’t call
Naming.unbind( )
on your
name, the object will be there. For this reason, when you’re developing
your code you need to shut down the rmiregistry and restart it when you
compile a new version of your remote object.
[ Add Comment ]
You aren’t forced to start up
rmiregistry as an external process. If you know that your application is
the only one that’s going to use the registry, you can start it up inside
your program with the line:
LocateRegistry.createRegistry(2005);
Like before, 2005 is the port number we
happen to be using in this example. This is the equivalent of running
rmiregistry 2005 from a command line, but it can often be more convenient
when you’re developing RMI code since it eliminates the extra steps of
starting and stopping the registry. Once you’ve executed this code, you
can bind( ) using Naming as before.
[ Add Comment ]
If you compile and run
PerfectTime.java, it won’t work even if you have the
rmiregistry running correctly. That’s because the framework for RMI
isn’t all there yet. You must first create the
stubs and
skeletons that provide the
network connection operations and allow you to pretend that the remote object is
just another local object on your machine.
[ Add Comment ]
What’s going on behind the scenes
is complex. Any objects that you pass into or return from a remote object must
implement Serializable
(if you want to pass remote references instead of the entire objects, the object
arguments can implement Remote), so you can imagine that the stubs and
skeletons are automatically performing serialization and deserialization as they
“marshal” all of the arguments across the network and return the
result. Fortunately, you don’t have to know any of this, but you do
have to create the stubs and skeletons. This is a simple process: you invoke the
rmic tool on your
compiled code, and it creates the necessary files. So the only requirement is
that another step be added to your compilation process.
[ Add Comment ]
The rmic tool is particular about
packages and classpaths,
however. PerfectTime.java is in the package c15.rmi, and even if
you invoke rmic in the same directory in which PerfectTime.class
is located, rmic won’t find the file, since it searches the
classpath. So you must specify the location off the class path, like
so:
rmic c15.rmi.PerfectTime
You don’t have to be in the
directory containing PerfectTime.class when you execute this command, but
the results will be placed in the current directory.
[ Add Comment ]
When rmic runs successfully,
you’ll have two new classes in the directory:
PerfectTime_Stub.class
PerfectTime_Skel.class
corresponding to the stub and skeleton.
Now you’re ready to get the server and client to talk to each other.
[ Add Comment ]
The whole point of RMI is to make the use
of remote objects simple. The only extra thing that you must do in your client
program is to look up and fetch the remote interface from the server. From then
on, it’s just regular Java programming: sending messages to objects.
Here’s the program that uses PerfectTime:
//: c15:rmi:DisplayPerfectTime.java
// Uses remote object PerfectTime.
package c15.rmi;
import java.rmi.*;
import java.rmi.registry.*;

public class DisplayPerfectTime {
  public static void main(String[] args)
  throws Exception {
    System.setSecurityManager(
      new RMISecurityManager());
    PerfectTimeI t =
      (PerfectTimeI)Naming.lookup(
        "//peppy:2005/PerfectTime");
    for(int i = 0; i < 10; i++)
      System.out.println("Perfect time = " +
        t.getPerfectTime());
  }
} ///:~
The ID string is the same as the one used
to register the object with Naming, and the first part represents the URL
and port number. Since you’re using a URL, you can also specify a machine
on the Internet.
[ Add Comment ]
What comes back from
Naming.lookup( ) must be cast to the remote interface, not to
the class. If you use the class instead, you’ll get an exception.
[ Add Comment ]
You can see in the method
call
t.getPerfectTime()
that once you have a reference to the
remote object, programming with it is indistinguishable from programming with a
local object (with one difference: remote methods throw
RemoteException).
[ Add Comment ]
In large, distributed applications, your
needs might not be satisfied by the preceding approaches. For example, you might
want to interface with legacy data stores, or you might need services from a
server object regardless of its physical location. These situations require some
form of Remote Procedure Call (RPC), and possibly language independence. This is
where CORBA can help.
[ Add Comment ]
CORBA is not a language feature;
it’s an integration technology. It’s a specification that vendors
can follow to implement CORBA-compliant integration products. CORBA is part of
the OMG’s effort to define a standard framework for distributed,
language-independent object interoperability.
[ Add Comment ]
CORBA supplies the ability to make remote
procedure calls into Java objects and non-Java objects, and to interface with
legacy systems in a location-transparent way. Java adds networking support and a
nice object-oriented language for building graphical and non-graphical
applications. The Java and OMG object model map nicely
to each other; for example, both Java and CORBA implement the interface concept
and a reference object model.
[ Add Comment ]
The object interoperability specification
developed by the OMG is commonly referred to as the Object Management
Architecture (OMA). The OMA defines two components: the Core Object Model and
the OMA Reference Architecture. The Core Object Model states the basic concepts
of object, interface, operation, and so on. (CORBA is a refinement of the Core
Object Model.) The OMA Reference Architecture defines an underlying
infrastructure of services and mechanisms that allow objects to interoperate.
The OMA Reference Architecture includes the Object Request Broker (ORB), Object
Services (also known as CORBA services), and common facilities.
[ Add Comment ]
The ORB is the communication bus by which
objects can request services from other objects, regardless of their physical
location. This means that what looks like a method call in the client code is
actually a complex operation. First, a connection with the server object must
exist, and to create a connection the ORB must know where the server
implementation code resides. Once the connection is established, the method
arguments must be marshaled, i.e. converted in a binary stream to be sent across
a network. Other information that must be sent are the server machine name, the
server process, and the identity of the server object inside that process.
Finally, this information is sent through a low-level wire protocol, the
information is decoded on the server side, and the call is executed. The ORB
hides all of this complexity from the programmer and makes the operation almost
as simple as calling a method on local object.
[ Add Comment ]
There is no specification for how an ORB
Core should be implemented, but to provide a basic compatibility among different
vendors’ ORBs, the OMG defines a set of services that are accessible
through standard interfaces.
[ Add Comment ]
CORBA is designed for language
transparency: a client object can call methods on a server object of different
class, regardless of the language they are implemented with. Of course, the
client object must know the names and signatures of methods that the server
object exposes. This is where IDL comes in. The CORBA IDL is a language-neutral
way to specify data types, attributes, operations, interfaces, and more. The IDL
syntax is similar to the C++ or Java syntax. The following table shows the
correspondence between some of the concepts common to three languages that can
be specified through CORBA IDL:
|
CORBA IDL |
Java |
C++ |
|
Module |
Package |
Namespace |
|
Interface |
Interface |
Pure abstract class |
|
Method |
Method |
Member function |
The inheritance concept is supported as
well, using the colon operator as in C++. The programmer writes an IDL
description of the attributes, methods, and interfaces that are implemented and
used by the server and clients. The IDL is then compiled by a vendor-provided
IDL/Java compiler, which reads the IDL source and generates Java
code.
The IDL compiler is an extremely useful
tool: it doesn’t just generate a Java source equivalent of the IDL, it
also generates the code that will be used to marshal method arguments and to
make remote calls. This code, called the stub and skeleton code, is organized in
multiple Java source files and is usually part of the same Java package.
[ Add Comment ]
The naming service is one of the
fundamental CORBA services. A CORBA object is accessed through a reference, a
piece of information that’s not meaningful for the human reader. But
references can be assigned programmer-defined, string names. This operation is
known as stringifying the reference, and one of the OMA components, the
Naming Service, is devoted to performing string-to-object and object-to-string
conversion and mapping. Since the Naming Service acts as a telephone directory
that both servers and clients can consult and manipulate, it runs as a separate
process. Creating an object-to-string mapping is called binding an
object, and removing the mapping is called unbinding. Getting an
object reference passing a string is called resolving the name.
[ Add Comment ]
For example, on startup, a server
application could create a server object, bind the object into the name service,
and then wait for clients to make requests. A client first obtains a server
object reference, resolving the string name, and then can make calls into the
server using the reference.
[ Add Comment ]
Again, the Naming Service specification
is part of CORBA, but the application that implements it is provided by the ORB
vendor. The way you get access to the Naming Service functionality can vary from
vendor to vendor.
[ Add Comment ]
The code shown here will not be elaborate
because different ORBs have different ways to access CORBA services, so examples
are vendor specific. (The example below uses JavaIDL, a free product from Sun
that comes with a light-weight ORB, a naming service, and an IDL-to-Java
compiler.) In addition, since Java is young and still evolving, not all CORBA
features are present in the various Java/CORBA products.
[ Add Comment ]
We want to implement a server, running on
some machine, that can be queried for the exact time. We also want to implement
a client that asks for the exact time. In this case we’ll be implementing
both programs in Java, but we could also use two different languages (which
often happens in real situations).
[ Add Comment ]
The first step is to write an IDL
description of the services provided. This is usually done by the server
programmer, who is then free to implement the server in any language in which a
CORBA IDL compiler exists. The IDL file is distributed to the client side
programmer and becomes the bridge between languages.
[ Add Comment ]
The example below shows the IDL
description of our ExactTime server:
//: c15:corba:ExactTime.idl
//# You must install idltojava.exe from
//# java.sun.com and adjust the settings to use
//# your local C preprocessor in order to compile
//# This file. See docs at java.sun.com.
module remotetime {
   interface ExactTime {
      string getTime();
   };
}; ///:~
This is a declaration of the
ExactTime interface inside the remotetime namespace. The interface
is made up of one single method that gives back the current time in
string format.
[ Add Comment ]
The second step is to compile the IDL to
create the Java stub and skeleton code that we’ll use for implementing the
client and the server. The tool that comes with the JavaIDL product is
idltojava:
idltojava remotetime.idl
This will automatically generate code for
both the stub and the skeleton. Idltojava generates a Java package
named after the IDL module, remotetime, and the generated Java files are
put in the remotetime subdirectory. _ExactTimeImplBase.java is the
skeleton that we’ll use to implement the server object, and
_ExactTimeStub.java will be used for the client. There are Java
representations of the IDL interface in ExactTime.java and a couple of
other support files used, for example, to facilitate access to the naming
service operations.
[ Add Comment ]
Below you can see the code for the server
side. The server object implementation is in the ExactTimeServer class.
The RemoteTimeServer is the application that creates a server object,
registers it with the ORB, gives a name to the object reference, and then sits
quietly waiting for client requests.
//: c15:corba:RemoteTimeServer.java
import remotetime.*;
import org.omg.CosNaming.*;
import org.omg.CosNaming.NamingContextPackage.*;
import org.omg.CORBA.*;
import java.util.*;
import java.text.*;

// Server object implementation
class ExactTimeServer extends _ExactTimeImplBase {
  public String getTime(){
    return DateFormat.
        getTimeInstance(DateFormat.FULL).
          format(new Date(
              System.currentTimeMillis()));
  }
}

// Remote application implementation
public class RemoteTimeServer {
  // Throw exceptions to console:
  public static void main(String[] args)
  throws Exception {
    // ORB creation and initialization:
    ORB orb = ORB.init(args, null);
    // Create the server object and register it:
    ExactTimeServer timeServerObjRef =
      new ExactTimeServer();
    orb.connect(timeServerObjRef);
    // Get the root naming context:
    org.omg.CORBA.Object objRef =
      orb.resolve_initial_references(
        "NameService");
    NamingContext ncRef =
      NamingContextHelper.narrow(objRef);
    // Assign a string name to the
    // object reference (binding):
    NameComponent nc =
      new NameComponent("ExactTime", "");
    NameComponent[] path = { nc };
    ncRef.rebind(path, timeServerObjRef);
    // Wait for client requests:
    java.lang.Object sync =
      new java.lang.Object();
    synchronized(sync){
      sync.wait();
    }
  }
} ///:~
As you can see, implementing the server
object is simple; it’s a regular Java class that inherits from the
skeleton code generated by the IDL compiler. Things get a bit more complicated
when it comes to interacting with the ORB and other CORBA services.
[ Add Comment ]
This is a short description of what the
JavaIDL-related code is doing (primarily ignoring the part of the CORBA code
that is vendor dependent). The first line in main( ) starts up the
ORB, and of course, this is because our server object will need to interact with
it. Right after the ORB initialization, a server object is created. Actually,
the right term would be a transient servant object: an object that
receives requests from clients, and whose lifetime is the same as the process
that creates it. Once the transient servant object is created, it is registered
with the ORB, which means that the ORB knows of its existence and can now
forward requests to it.
[ Add Comment ]
Up to this point, all we have is
timeServerObjRef, an object reference that is known only inside the
current server process. The next step will be to assign a stringified name to
this servant object; clients will use that name to locate the servant object. We
accomplish this operation using the Naming Service. First, we need an object
reference to the Naming Service; the call to
resolve_initial_references( ) takes the stringified object reference
of the Naming Service that is “NameService,” in JavaIDL, and returns
an object reference. This is cast to a specific NamingContext reference
using the narrow( ) method. We can use now the naming services.
[ Add Comment ]
To bind the servant object with a
stringified object reference, we first create a NameComponent object,
initialized with “ExactTime,” the name string we want to bind to the
servant object. Then, using the rebind( ) method, the stringified
reference is bound to the object reference. We use rebind( ) to
assign a reference, even if it already exists, whereas bind( )
raises an exception if the reference already exists. A name is made up in CORBA
by a sequence of NameContexts—that’s why we use an array to bind the
name to the object reference.
[ Add Comment ]
The servant object is finally ready for
use by clients. At this point, the server process enters a wait state. Again,
this is because it is a transient servant, so its lifetime is confined to the
server process. JavaIDL does not currently support persistent
objects—objects that survive the execution of the process that creates
them.
[ Add Comment ]
Now that we have an idea of what the
server code is doing, let’s look at the client code:
//: c15:corba:RemoteTimeClient.java
import remotetime.*;
import org.omg.CosNaming.*;
import org.omg.CORBA.*;

public class RemoteTimeClient {
  // Throw exceptions to console:
  public static void main(String[] args)
  throws Exception {
    // ORB creation and initialization:
    ORB orb = ORB.init(args, null);
    // Get the root naming context:
    org.omg.CORBA.Object objRef =
      orb.resolve_initial_references(
        "NameService");
    NamingContext ncRef =
      NamingContextHelper.narrow(objRef);
    // Get (resolve) the stringified object
    // reference for the time server:
    NameComponent nc =
      new NameComponent("ExactTime", "");
    NameComponent[] path = { nc };
    ExactTime timeObjRef =
      ExactTimeHelper.narrow(
        ncRef.resolve(path));
    // Make requests to the server object:
    String exactTime = timeObjRef.getTime();
    System.out.println(exactTime);
  }
} ///:~
The first few lines do the same as they
do in the server process: the ORB is initialized and a reference to the naming
service server is resolved. Next, we need an object reference for the servant
object, so we pass the stringified object reference to the
resolve( ) method, and we cast the result into an ExactTime
interface reference using the narrow( ) method. Finally, we call
getTime( ).
[ Add Comment ]
Finally we have a server and a client
application ready to interoperate. You’ve seen that both need the naming
service to bind and resolve stringified object references. You must start the
naming service process before running either the server or the client. In
JavaIDL, the naming service is a Java application that comes with the product
package, but it can be different with other products. The JavaIDL naming service
runs inside an instance of the JVM and listens by default to network port 900.
[ Add Comment ]
Now you are ready to start your server
and client application (in this order, since our server is transient). If
everything is set up correctly, what you’ll get is a single output line on
the client console window, giving you the current time. Of course, this might be
not very exciting by itself, but you should take one thing into account: even if
they are on the same physical machine, the client and the server application are
running inside different virtual machines and they can communicate via an
underlying integration layer, the ORB and the Naming Service.
[ Add Comment ]
This is a simple example, designed to
work without a network, but an ORB is usually configured for location
transparency. When the server and the client are on different machines, the ORB
can resolve remote stringified references using a component known as the
Implementation Repository. Although the Implementation Repository is part
of CORBA, there is almost no specification, so it differs from vendor to vendor.
[ Add Comment ]
As you can see, there is much more to
CORBA than what has been covered here, but you should get the basic idea. If you
want more information about CORBA, the place to start is the OMG Web site, at
www.omg.org. There you’ll find documentation, white papers,
proceedings, and references to other CORBA sources and products.
[ Add Comment ]
Java applets can act as CORBA clients.
This way, an applet can access remote information and services exposed as CORBA
objects. But an applet can connect only with the server from which it was
downloaded, so all the CORBA objects the applet interacts with must be on that
server. This is the opposite of what CORBA tries to do: give you complete
location transparency.
[ Add Comment ]
This is an issue of network security. If
you’re on an intranet, one solution is to loosen the security restrictions
on the browser. Or, set up a firewall policy for connecting with external
servers.
[ Add Comment ]
Some Java ORB products offer proprietary
solutions to this problem. For example, some implement what is called HTTP
Tunneling, while others have their special firewall features.
[ Add Comment ]
This is too complex a topic to be covered
in an appendix, but it is definitely something you should be aware of.
[ Add Comment ]
You saw that one of the main CORBA
features is RPC support, which allows your local objects to call methods in
remote objects. Of course, there already is a native Java feature that does
exactly the same thing: RMI (see Chapter 15). While RMI makes RPC possible
between Java objects, CORBA makes RPC possible between objects implemented in
any language. It’s a big difference.
[ Add Comment ]
However, RMI can
be used to call services on remote, non-Java code. All you need is some kind of
wrapper Java object around the non-Java code on the server side. The wrapper
object connects externally to Java clients via RMI, and internally connects to
the non-Java code using one of the techniques shown above, such as JNI or
J/Direct.
[ Add Comment ]
This approach requires you to write a
kind of integration layer, which is exactly what CORBA does for you, but then
you don’t need a third-party ORB.
[ Add Comment ]
Suppose[77]
you need to develop a multi-tiered application to view and update records in a
database through a Web interface. You can write a database application using
JDBC, a Web interface using JSP/servlets, and a distributed system using
CORBA/RMI. But what extra considerations must you make when developing a
distributed object system rather than just knowing API’s? Here are the
issues:
[ Add Comment ]
Performance: The
distributed objects you create must perform well, as they could potentially
service many clients at a time. You’ll need to use optimization techniques
such as caching as well as pooling resources like database connections.
You’ll also have to manage the lifecycle of your distributed objects.
[ Add Comment ]
Scalability: The
distributed objects must also be scalable. Scalability in a distributed
application means that the number of instances of your distributed objects can
be increased and moved onto additional machines without modifying any code.
[ Add Comment ]
Security: A distributed
object must often manage the authorization of the clients that access it.
Ideally, you can add new users and roles to it without recompilation.
[ Add Comment ]
Distributed Transactions: A
distributed object should be able to reference distributed transactions
transparently. For example, if you are working with two separated databases, you
should be able to update them simultaneously within the same transaction and
roll them both back if a certain criteria is not met.
[ Add Comment ]
Reusability: The ideal
distributed object can be effortlessly moved onto another vendors’
application server. It would be nice if you could resell a distributed object
component without making special modifications, or buy someone else’s
component and use it without having to recompile or rewrite it.
[ Add Comment ]
Availability: If one of the
machines in the system goes down, clients should automatically fail-over to
backup copies of the objects running on other machines.
[ Add Comment ]
These considerations, in addition the
business problem that you set out to solve, can make for a daunting development
project. However, all the issues except for your business problem are
redundant—solutions must be reinvented for every distributed business
application.
[ Add Comment ]
Sun, along with other leading distributed
object vendors, realized that sooner or later every development team would be
reinventing these particular solutions, so they created the Enterprise JavaBeans
specification (EJB). EJB describes a server-side component model that tackles
all of the considerations mentioned above using a standard approach that allows
developers to create business components called EJBs that are isolated from
low-level “plumbing” code and that focus solely on providing
business logic. Because EJB’s are defined in a standard way, they can
vendor independent.
[ Add Comment ]
Because of the similarity in names, there
is much confusion about the relationship between the JavaBeans component model
and the Enterprise JavaBeans specification. While both the JavaBeans and
Enterprise JavaBeans specifications share the same objectives in promoting reuse
and portability of Java code between development and deployment tools with the
use of standard design patterns, the motives behind each specification are
geared to solve different problems.
[ Add Comment ]
The standards defined in the JavaBeans
component model are designed for creating reusable components that are typically
used in IDE development tools and are commonly, although not exclusively, visual
components.
[ Add Comment ]
The Enterprise JavaBeans specification
defines a component model for developing server side java code. Because EJBs can
potentially run on many different server-side platforms—including
mainframes that do not have visual displays—An EJB cannot make use of
graphical libraries such as AWT or Swing.
[ Add Comment ]
The Enterprise JavaBeans specification
describes a server-side component model. It defines six roles that are used to
perform the tasks in development and deployment as well as defining the
components of the system. These roles are used in the development, deployment
and running of a distributed system. Vendors, administrators and developers play
the various roles, to allow the partitioning of technical and domain knowledge.
The vendor provides a technically sound framework and the developers create
domain-specific components; for example, an “accounting” component.
The same party can perform one or many roles. The roles defined in the EJB
specification are summarized in the following table:
|
Role |
Responsibility |
|
Enterprise Bean Provider |
The developer responsible for creating
reusable EJB components. These components are packaged into a special jar file
(ejb-jar file). |
|
Application Assembler |
Creates and assembles applications from a
collection of ejb-jar files. This includes writing applications that utilize the
collection of EJBs (e.g., servlets, JSP, Swing etc. etc.). |
|
Deployer |
Takes the collection of ejb-jar files
from the Assembler and/or Bean Provider and deploys them into a run-time
environment: one or more EJB Containers. |
|
EJB Container/Server Provider
|
Provides a run-time environment and tools
that are used to deploy, administer, and run EJB components. |
|
System Administrator |
Manages the different components and
services so that they are configured and they interact correctly, as well as
ensuring that the system is up and running. |
EJB components are elements of reusable
business logic that adhere to strict standards and design patterns as defined in
the EJB specification. This allows the components to be portable. It also allows
other services—such as security, caching and distributed
transactions—to be performed on behalf of the components. An Enterprise
Bean Provider is responsible for developing EJB components.
[ Add Comment ]
The EJB Container is a run-time
environment that contains and runs EJB components and provides a set of standard
services to those components. The EJB Container’s responsibilities are
tightly defined by the specification to allow for vendor neutrality. The EJB
container provides the low-level “plumbing” of EJB, including
distributed transactions, security, lifecycle management of beans, caching,
threading and session management. The EJB Container Provider is responsible for
providing an EJB Container.
[ Add Comment ]
An EJB Server is defined as an
Application Server that contains and runs one or more EJB Containers. The EJB
Server Provider is responsible for providing an EJB Server. You can generally
assume that the EJB Container and EJB Server are the same.
[ Add Comment ]
Java Naming and Directory Interface
(JNDI) is used in Enterprise JavaBeans as the naming service for EJB Components
on the network and other container services such as transactions. JNDI maps very
closely to other naming and directory standards such as CORBA CosNaming and can
actually be implemeted as a wrapper on top of it.
[ Add Comment ]
JTA/JTS is used in Enterprise JavaBeans
as the transactional API. An Enterprise Bean Provider can use the JTS to create
transaction code, although the EJB Container commonly implements transactions in
EJB on the EJB components’ behalf. The deployer can define the
transactional attributes of an EJB component at deployment time. The EJB
Container is responsible for handling the transaction whether it is local or
distributed. The JTS specification is the Java mapping to the CORBA OTS (Object
Transaction Service)
[ Add Comment ]
The EJB specification defines
interoperability with CORBA through compatibility with CORBA protocols. This is
achieved by mapping EJB services such as JTS and JNDI to corresponding CORBA
services and the implementation of RMI on top of the CORBA protocol IIOP.
[ Add Comment ]
Use of CORBA and RMI/IIOP in Enterprise
JavaBeans is implemented in the EJB Container and is the responsibility of the
EJB Container provider. Use of CORBA and RMI/IIOP in the EJB Container is hidden
from the EJB Component itself. This means that the Enterprise Bean Provider can
write their EJB Component and deploy it into any EJB Container without any
regard of which communication protocol is being used.
[ Add Comment ]
An EJB consists of a number of pieces,
including the Bean itself, the implementation of some interfaces, and an
information file. Everything is packaged together into a special jar file.
[ Add Comment ]
The Enterprise Bean is a Java class that
the Enterprise Bean Provider develops. It implements an Enterprise Bean
interface and provides the implementation of the business methods that the
component is to perform. The class does not implement any authorization,
authentication, multithreading, or transactional code.
[ Add Comment ]
Every Enterprise Bean that is created
must have an associated Home interface. The Home interface is used as a factory
for your EJB. Clients use the Home interface to find an instance of your EJB or
create a new instance of your EJB.
[ Add Comment ]
The Remote interface is a Java Interface
that reflects the methods of your Enterprise Bean that you wish to expose to the
outside world. The Remote interface plays a similar role to a CORBA IDL
interface.
[ Add Comment ]
The deployment descriptor is an XML file
that contains information about your EJB. Using XML allows the deployer to
easily change attributes about your EJB. The configurable attributes defined in
the deployment descriptor include:
The EJB-Jar file is a normal java jar
file that contains your EJB, Home and Remote interfaces, as well as the
deployment descriptor.
[ Add Comment ]
Once you have an EJB-Jar file containing
the Bean, the Home and Remote interfaces, and the deployment descriptor, you can
fit all of the pieces together and in the process understand why the Home and
Remote interfaces are needed and how the EJB Container uses them.
[ Add Comment ]
The EJB Container implements the Home and
Remote interfaces that are in the EJB-Jar file. As mentioned earlier, the Home
interface provides methods to create and find your EJB. This means that the EJB
Container is responsible for the lifecycle management of your EJB. This level of
indirection allows for optimizations to occur. For example, 5 clients might
simultaneously request the creation of an EJB through a Home Interface, and the
EJB Container would respond by creating only one EJB and sharing it between all
5 clients. This is achieved through the Remote Interface, which is also
implemented by the EJB Container. The implemented Remote object plays the role
of a proxy object to the EJB.
[ Add Comment ]
All calls to the EJB are
‘proxied’ through the EJB Container via the Home and Remote
interfaces. This indirection is the reason why the EJB container can control
security and transactional behavior.
[ Add Comment ]
The Enterprise JavaBeans specification
defines different types of EJBs that have different characteristics and
behaviors. Two categories of EJBs have been defined in the specification:
Session Beans and Entity Beans, and each categoriy has variations.
[ Add Comment ]
Session Beans are used to represent
Use-Cases or Workflow on behalf of a client. They represent operations on
persistent data, but not the persistent data itself. There are two types of
Session Beans, Stateless and Stateful. All Session Beans must
implement the javax.ejb.SessionBean interface. The EJB Container governs
the life of a Session Bean.
[ Add Comment ]
Stateless Session Beans are the
simplest type of EJB component to implement. They do not maintain any
conversational state with clients between method invocations so they are easily
reusable on the server side and because they can be cached, they scale well on
demand. When using Stateless Session Beans, all state must be stored outside of
the EJB.
[ Add Comment ]
Stateful Session Beans maintain
state between invocations. They have a one-to-one logical mapping to a client
and can maintain state within themselves. The EJB Container is responsible for
pooling and caching of Stateful Session Beans, which is achieved through
Passivation and Activation. If the EJB Container crashes, data for
all Stateful Session Beans could be lost. Some high-end EJB Containers provide
recovery for Stateful Session Beans.
[ Add Comment ]
Entity Beans are components that
represent persistent data and behavior of this data. Entity Beans can be shared
among multiple clients, the same way that data in a database can be shared. The
EJB Container is responsible for caching Entity Beans and for maintaining the
integrity of the Entity Beans. The life of an Entity Bean outlives the EJB
Container, so if an EJB Container crashes, the Entity Bean is still expected to
be available when the EJB Container again becomes available.
[ Add Comment ]
There are two types of Entity Beans:
those with Container Managed persistence and those with Bean-Managed
persistence.
[ Add Comment ]
Container Managed Persistence
(CMP). A CMP Entity Bean has its persistence implemented on its behalf by
the EJB Container. Through attributes specified in the deployment descriptor,
the EJB Container will map the Entity Bean’s attributes to some persistent
store (usually—but not always—a database). CMP reduces the
development time for the EJB, as well as dramatically reducing the amount of
code required.
[ Add Comment ]
Bean Managed Persistence (BMP). A
BMP Entity Bean has its persistence implemented by the Enterprise Bean Provider.
The Enterprise Bean Provider is responsible for implementing the logic required
to create a new EJB, update some attributes of the EJBS, delete an EJB and find
an EJB from persistent store. This usually involves writing JDBC code to
interact with a database or other persistent store. With BMP, the developer is
in full control of how the Entity Bean persistence is managed.
[ Add Comment ]
BMP also gives flexibility where a CMP
implementation may not be available. For example, if you wanted to create an EJB
that wrapped some code on an existing mainframe system, you could write your
persistence using CORBA.
[ Add Comment ]
As an example, the “Perfect
Time” example from the previous RMI section will be implemented as an EJB
component. The example will be a simple Stateless Session Bean.
[ Add Comment ]
As mentioned earlier, EJB components
consist of at least one class (the EJB) and two interfaces: the Remote and Home
interfaces. When you create a Remote interface for an EJB , you must follow
these guidelines:
[ Add Comment ]
Here is the simple remote interface for the PerfectTime EJB:
//: c15:ejb:PerfectTime.java
//# You must install the J2EE Java Enterprise
//# Edition from java.sun.com and add j2ee.jar
//# to your CLASSPATH in order to compile
//# this file. See details at java.sun.com.
// Remote Interface of PerfectTimeBean
import java.rmi.*;
import javax.ejb.*;

public interface PerfectTime extends EJBObject {
  public long getPerfectTime()
    throws RemoteException;
} ///:~
The Home interface is the factory where
the component will be created. It can define create methods, to create
instances of EJBs, or finder methods, which locate existing EJBs and are
used for Entity Beans only. When you create a Home interface for an EJB , you
must follow these guidelines:
The
standard naming convention for Home interfaces is to take the Remote interface
name and append “Home” to the end. Here is the Home interface for
the PerfectTime EJB:
[ Add Comment ]
//: c15:ejb:PerfectTimeHome.java
// Home Interface of PerfectTimeBean.
import java.rmi.*;
import javax.ejb.*;

public interface PerfectTimeHome extends EJBHome {
  public PerfectTime create()
    throws CreateException, RemoteException;
} ///:~
You can now implement the business logic.
When you create your EJB implementation class, you must follow these guidelines,
(note that you should consult the EJB specification for a complete list of
guidelines when developing Enterprise JavaBeans):
[ Add Comment ]
//: c15:ejb:PerfectTimeBean.java
// Simple Stateless Session Bean
// that returns current system time.
import java.rmi.*;
import javax.ejb.*;

public class PerfectTimeBean
  implements SessionBean {
  private SessionContext sessionContext;
  //return current time
  public long getPerfectTime() {
     return System.currentTimeMillis();
  }
  // EJB methods
  public void ejbCreate()
  throws CreateException {}
  public void ejbRemove() {}
  public void ejbActivate() {}
  public void ejbPassivate() {}
  public void
  setSessionContext(SessionContext ctx) {
    sessionContext = ctx;
  }
}///:~
Because this is a simple example, the EJB
methods (ejbCreate( ), ejbRemove( ),
ejbActivate( ), ejbPassivate( ) ) are all empty. These
methods are invoked by the EJB Container and are used to control the state of
the component. The setSessionContext( ) method passes a
javax.ejb.SessionContext object which contains information about the
component’s context, such as the current transaction and security
information.
[ Add Comment ]
After we have created the Enterprise
JavaBean, we then need to create a deployment descriptor. The deployment
descriptor is an XML file that describes the EJB component. The deployment
descriptor should be stored in a file called ejb-jar.xml.
[ Add Comment ]
//:! c15:ejb:ejb-jar.xml
<?xml version="1.0" encoding="Cp1252"?>
<!DOCTYPE ejb-jar PUBLIC '-//Sun Microsystems, Inc.//DTD Enterprise JavaBeans 1.1//EN' 'http://java.sun.com/j2ee/dtds/ejb-jar_1_1.dtd'>

<ejb-jar>
  <description>Example for Chapter 15</description>
  <display-name></display-name>
  <small-icon></small-icon>
  <large-icon></large-icon>
  <enterprise-beans>
    <session>
      <ejb-name>PerfectTime</ejb-name>
      <home>PerfectTimeHome</home>
      <remote>PerfectTime</remote>
      <ejb-class>PerfectTimeBean</ejb-class>
      <session-type>Stateless</session-type>
      <transaction-type>Container</transaction-type>
    </session>
  </enterprise-beans>
  <ejb-client-jar></ejb-client-jar>
</ejb-jar>
///:~
You can see the Component, the Remote
interface and the Home interface defined inside the <session> tag
of this deployment descriptor. Deployment descriptors may be automatically
generated using EJB development tools.
[ Add Comment ]
Along with the standard ejb-jar.xml
deployment descriptor, the EJB specification states that any vendor specific
tags should be stored in a separate file. This is to achieve high portability
between components and different brands of EJB containers.
[ Add Comment ]
The files must be archived inside a
standard Java Archive (JAR) file. The deployment descriptors should be placed
inside the /META-INF sub-directory of the Jar file.
[ Add Comment ]
Once the EJB component is defined in the
deployment descriptor, the deployer should then deploy the EJB component into
the EJB Container. At the time of this writing, the deployment process was quite
“GUI intensive” and specific to each individual EJB Container, so
this overview does not document that process. Every EJB Container, however will
have a documented process for deploying an EJB.
[ Add Comment ]
Because an EJB component is a distributed
object, the deployment process should also create some client stubs for calling
the EJB component. These classes should be placed on the classpath of the client
application. Because EJB components can be implemented on top of RMI-IIOP
(CORBA) or RMI-JRMP, the stubs generated could vary between EJB Containers;
nevertheless they are generated classes.
[ Add Comment ]
When a client program wishes to invoke an
EJB, it must look up the EJB component inside JNDI and obtain a reference to the
home interface of the EJB component. The Home interface is used to create an
instance of the EJB.
[ Add Comment ]
In this example the client program is a
simple Java program, but you should remember that it could just as easily be a
servlet, a JSP or even a CORBA or RMI distributed object.
//: c15:ejb:PerfectTimeClient.java
// Client program for PerfectTimeBean

public class PerfectTimeClient {
public static void main(String[] args)
throws Exception {
  // Get a JNDI context using
  // the JNDI Naming service:
  javax.naming.Context context =
    new javax.naming.InitialContext();
  // Look up the home interface in the
  // JNDI Naming service:
  Object ref = context.lookup("perfectTime");
  // Cast the remote object to the home interface:
  PerfectTimeHome home = (PerfectTimeHome)
    javax.rmi.PortableRemoteObject.narrow(
      ref, PerfectTimeHome.class);
  // Create a remote object from the home interface:
  PerfectTime pt = home.create();
  // Invoke  getPerfectTime()
  System.out.println(
    "Perfect Time EJB invoked, time is: " +
    pt.getPerfectTime() );
  }
} ///:~
The sequence of the example is explained
in the comments. Note the use of the narrow( ) method to perform a
kind of casting of the object before a Java cast is performed. This is very
similar to what happens in CORBA. Also note that the Home object becomes a
factory for PerfectTime objects.
[ Add Comment ]
The Enterprise JavaBeans specification is
a dramatic step forward in the standardization and simplification of distributed
object computing. It is a major piece of the Java 2 Enterprise Edition (J2EE)
platform and is receiving much support from the distributed object community.
Many tools are currently available or will be available in the near future to
help accelerate the development of EJB components.
[ Add Comment ]
This overview was only a brief tour of
EJBs. For more information about the EJB specification you should see the
official Enterprise JavaBeans home page at java.sun.com/products/ejb/,
where you can download the latest specification and the J2EE reference
implementation. These can be used to develop and deploy your own EJB components.
[ Add Comment ]
This
section[78] gives
an overview of Sun Microsystems’s Jini technology. It describes some Jini
nuts and bolts and shows how Jini’s architecture helps to raise the level
of abstraction in distributed systems programming, effectively turning network
programming into object-oriented programming.
[ Add Comment ]
Traditionally, operating systems have
been designed with the assumption that a computer will have a processor, some
memory, and a disk. When you boot a computer, the first thing it does is look
for a disk. If it doesn’t find a disk, it can’t function as a
computer. Increasingly, however, computers are appearing in a different guise:
as embedded devices that have a processor, some memory, and a network
connection—but no disk. The first thing a cell phone does when you boot it
up, for example, is look for the telephone network. If it doesn’t find the
network, it can’t function as a cell phone. This trend in the hardware
environment, from disk-centric to network-centric, will affect how we organize
the software—and that’s where Jini comes in.
[ Add Comment ]
Jini is an attempt to rethink computer
architecture, given the rising importance of the network and the proliferation
of processors in devices that have no disk drive. These devices, which will come
from many different vendors, will need to interact over a network. The network
itself will be very dynamic—devices and services will be added and removed
regularly. Jini provides mechanisms to enable smooth adding, removal, and
finding of devices and services on the network. In addition, Jini provides a
programming model that makes it easier for programmers to get their devices
talking to each other.
[ Add Comment ]
Building on top of Java, object
serialization, and RMI (which together enable objects to move around the network
from virtual machine to virtual machine) Jini attempts to extend the benefits of
object-oriented programming to the network. Instead of requiring device vendors
to agree on the network protocols through which their devices can interact, Jini
enables the devices to talk to each other through interfaces to objects.
[ Add Comment ]
Jini is a set of APIs and network
protocols that can help you build and deploy distributed systems that are
organized as federations of services. A service can be anything
that sits on the network and is ready to perform a useful function. Hardware
devices, software, communications channels—even human users
themselves—can be services. A Jini-enabled disk drive, for example, could
offer a “storage” service. A Jini-enabled printer could offer a
“printing” service. A federation of services, then, is a set of
services, currently available on the network, that a client (meaning a program,
service, or user) can bring together to help it accomplish some goal.
[ Add Comment ]
To perform a task, a client enlists the
help of services. For example, a client program might upload pictures from the
image storage service in a digital camera, download the pictures to a persistent
storage service offered by a disk drive, and send a page of thumbnail-sized
versions of the images to the printing service of a color printer. In this
example, the client program builds a distributed system consisting of itself,
the image storage service, the persistent storage service, and the
color-printing service. The client and services of this distributed system work
together to perform the task: to offload and store images from a digital camera
and print a page of thumbnails.
[ Add Comment ]
The idea behind the word federation
is that the Jini view of the network doesn’t involve a central
controlling authority. Because no one service is in charge, the set of all
services available on the network form a federation—a group composed of
equal peers. Instead of a central authority, Jini’s run-time
infrastructure merely provides a way for clients and services to find each other
(via a lookup service, which stores a directory of currently available
services). After services locate each other, they are on their own. The client
and its enlisted services perform their task independently of the Jini run-time
infrastructure. If the Jini lookup service crashes, any distributed systems
brought together via the lookup service before it crashed can continue their
work. Jini even includes a network protocol that clients can use to find
services in the absence of a lookup service.
[ Add Comment ]
Jini defines a run-time infrastructure
that resides on the network and provides mechanisms that enable you to add,
remove, locate, and access services. The run-time infrastructure resides in
three places: in lookup services that sit on the network, in the service
providers (such as Jini-enabled devices), and in clients. Lookup services
are the central organizing mechanism for Jini-based systems. When new
services become available on the network, they register themselves with a lookup
service. When clients wish to locate a service to assist with some task, they
consult a lookup service.
[ Add Comment ]
The run-time infrastructure uses one
network-level protocol, called discovery, and two object-level protocols,
called join and lookup. Discovery enables clients and services to
locate lookup services. Join enables a service to register itself in a lookup
service. Lookup enables a client to query for services that can help accomplish
its goals.
[ Add Comment ]
Discovery works like this: Imagine you
have a Jini-enabled disk drive that offers a persistent storage service. As soon
as you connect the drive to the network, it broadcasts a presence
announcement by dropping a multicast packet onto a well-known port. Included
in the presence announcement is an IP address and port number where the disk
drive can be contacted by a lookup service.
[ Add Comment ]
Lookup services monitor the well-known
port for presence announcement packets. When a lookup service receives a
presence announcement, it opens and inspects the packet. The packet contains
information that enables the lookup service to determine whether or not it
should contact the sender of the packet. If so, it contacts the sender directly
by making a TCP connection to the IP address and port number extracted from the
packet. Using RMI, the lookup service sends an object, called a service
registrar, across the network to the originator of the packet. The purpose
of the service registrar object is to facilitate further communication with the
lookup service. By invoking methods on this object, the sender of the
announcement packet can perform join and lookup on the lookup service. In the
case of the disk drive, the lookup service would make a TCP connection to the
disk drive and would send it a service registrar object, through which the disk
drive would then register its persistent storage service via the join process.
[ Add Comment ]
Once a service provider has a service
registrar object, the end product of discovery, it is ready to do a
join—to become part of the federation of services that are registered in
the lookup service. To do a join, the service provider invokes the
register( ) method on the service registrar object, passing as a
parameter an object called a service item, a bundle of objects that describe the
service. The register( ) method sends a copy of the service item up
to the lookup service, where the service item is stored. Once this has
completed, the service provider has finished the join process: its service has
become registered in the lookup service.
[ Add Comment ]
The service item is a container for
several objects, including an object called a service object, which
clients can use to interact with the service. The service item can also include
any number of attributes, which can be any object. Some potential
attributes are icons, classes that provide GUIs for the service, and objects
that give more information about the service.
[ Add Comment ]
Service objects usually implement one or
more interfaces through which clients interact with the service. For example, a
lookup service is a Jini service, and its service object is the service
registrar. The register( ) method invoked by service providers
during join is declared in the ServiceRegistrar interface (a member of
the net.jini.core.lookup package), which all service registrar objects
implement. Clients and service providers talk to the lookup service through the
service registrar object by invoking methods declared in the
ServiceRegistrar interface. Likewise, a disk drive would provide a
service object that implemented some well-known storage service interface.
Clients would look up and interact with the disk drive by this storage service
interface.
[ Add Comment ]
Once a service has registered with a
lookup service via the join process, that service is available for use by
clients who query that lookup service. To build a distributed system of services
that will work together to perform some task, a client must locate and enlist
the help of the individual services. To find a service, clients query lookup
services via a process called lookup.
[ Add Comment ]
To perform a lookup, a client invokes the
lookup( ) method on a service registrar object. (A client, like a
service provider, gets a service registrar through the previously-described
process of discovery.) The client passes as an argument to lookup( )
a service template, an object that serves as search criteria for the
query. The service template can include a reference to an array of Class
objects. These Class objects indicate to the lookup service the Java type
(or types) of the service object desired by the client. The service template can
also include a service ID, which uniquely identifies a service, and
attributes, which must exactly match the attributes uploaded by the service
provider in the service item. The service template can also contain wildcards
for any of these fields. A wildcard in the service ID field, for example, will
match any service ID. The lookup( ) method sends the service
template to the lookup service, which performs the query and sends back zero to
any matching service objects. The client gets a reference to the matching
service objects as the return value of the lookup( ) method.
[ Add Comment ]
In the general case, a client looks up a
service by Java type, usually an interface. For example, if a client needed to
use a printer, it would compose a service template that included a Class
object for a well-known interface to printer services. All printer services
would implement this well-known interface. The lookup service would return a
service object (or objects) that implemented this interface. Attributes can be
included in the service template to narrow the number of matches for such a
type-based search. The client would use the printer service by invoking methods
from the well-known printer service interface on the service object.
[ Add Comment ]
Jini’s architecture brings
object-oriented programming to the network by enabling network services to take
advantage of one of the fundamentals of objects: the separation of interface and
implementation. For example, a service object can grant clients access to the
service in many ways. The object can actually represent the entire service,
which is downloaded to the client during lookup and then executed locally.
Alternatively, the service object can serve merely as a proxy to a remote
server. Then when the client invokes methods on the service object, it sends the
requests across the network to the server, which does the real work. A third
option is for the local service object and a remote server to each do part of
the work.
[ Add Comment ]
One important consequence of Jini’s
architecture is that the network protocol used to communicate between a proxy
service object and a remote server does not need to be known to the client. As
illustrated in the figure below, the network protocol is part of the
service’s implementation. This protocol is a private matter decided upon
by the developer of the service. The client can communicate with the service via
this private protocol because the service injects some of its own code (the
service object) into the client’s address space. The injected service
object could communicate with the service via RMI, CORBA, DCOM, some home-brewed
protocol built on top of sockets and streams, or anything else. The client
simply doesn’t need to care about network protocols, because it can talk
to the well-known interface that the service object implements. The service
object takes care of any necessary communication on the network.
[ Add Comment ]
Different implementations of the same
service interface can use completely different approaches and network protocols.
A service can use specialized hardware to fulfill client requests, or it can do
all its work in software. In fact, the implementation approach taken by a single
service can evolve over time. The client can be sure it has a service object
that understands the current implementation of the service, because the client
receives the service object (by way of the lookup service) from the service
provider itself. To the client, a service looks like the well-known interface,
regardless of how the service is implemented.
[ Add Comment ]
Jini attempts to raise the level of
abstraction for distributed systems programming, from the network protocol level
to the object interface level. In the emerging proliferation of embedded devices
connected to networks, many pieces of a distributed system may come from
different vendors. Jini makes it unnecessary for vendors of devices to agree on
network level protocols that allow their devices to interact. Instead, vendors
must agree on Java interfaces through which their devices can interact. The
processes of discovery, join, and lookup, provided by the Jini run-time
infrastructure, enable devices to locate each other on the network. Once they
locate each other, devices can communicate with each other through Java
interfaces.
[ Add Comment ]
Along with Jini for local device
networks, this chapter has introduced some, but not all, of the components that
Sun refers to as J2EE: the Java 2 Enterprise Edition. The goal of J2EE is
to build create a set of tools that allows the Java
developer to build server-based applications much more
quickly than before, and in a platform-independent way. It’s not
only difficult and time-consuming to build such applications, but it’s
especially hard to build them so that they can be easily ported to other
platforms, and also to keep the business logic separated from the underlying
details of the implementation. J2EE provides a framework to assist in creating
server-based applications; these applications are in demand now, and that demand
appears to be increasing.
[ Add Comment ]
Solutions to selected exercises
can be found in the electronic document The Thinking in Java Annotated
Solution Guide, available for a small fee from
www.BruceEckel.com.
[72]
This means a maximum of just over four billion numbers, which is rapidly running
out. The new standard for IP addresses will use a 128-bit number, which should
produce enough unique IP addresses for the foreseeable future.
[73]
Created by Dave Bartlett.
[74]
Dave Bartlett was instrumental in the development of this material, and also the
JSP section.
[75]
A primary tenet of Extreme Programming (XP). See
www.xprogramming.com.
[76]
Many brain cells died in agony to discover this information.
[77]
This section was contributed by Robert Castaneda, with help from Dave
Bartlett.
[78]
This section was contributed by Bill Venners (www.artima.com).