Parallel
Systems
EPDA Performance Analyzer Tool
User Documentation
objectives
- files - PAPI experiments recording
- general recording - EPDA tool
- To automate the measurement and analysis of computer
performance.
- Results (parameters & measurements) of experiments are
written to a database with the EPDA experiment recorder.
The EPDA graphical tool let you analyze the data.
Files
Downloading them is not supported for
the moment (please send an email
to
jan.lemeire@vub.ac.be).
For our linux users (PARDIR is set in your
.cshrc file):
- the header file EPDAExpRecorder.h
is located in PARDIR/include
- the library libepda.a
is located in PARDIR/lib
- the tool EPDA is
located in PARDIR/bin
Download:
Performance
Experiments recording with PAPI (see PAPIProfiler.h)
Example program
- Maak een PAPIProfiler
object
- (Optioneel) Measure(start-index,
aantal): Geef aan welke events je wilt meten uit de lijst . Met PrintCounters() krijg je heel
de lijst.
- (Optioneel) SetMuxMode(Boolean):
Activeer multiplexing, zodat alle counters simultaan gemeten kunnen
worden. Hiervoor moet je applicatie wel minstens 5 miljoen cycles duren.
- (Optioneel) ContinueMeasuring():
Om zonder multiplexing toch meerdere counters te meten dan dat er
aanwezig zijn op je processor, moet je je experiment meermaals
uitvoeren. Gebruik deze methode om je experiment in een loop te zetten.
- StartMeasuring():
start het meten van de counters
- StopMeasuring():
stop meten
- PrintMeasurements():
print resultaten
- Write2EPDA(applicatienaam,
projectnaam, commentaar): zal de runtime en PAPI-metingen naar
de database schrijven tijdens de destructor. Je krijgt dan het
experiment ID waarmee het in de database staat.
-
SetEPDAExperimentVariable(variabele, variabeletype, int waarde, eenheid, commentaar)
SetEPDAExperimentVariable(variabele, variabeletype, double waarde, eenheid, commentaar)
SetEPDAExperimentVariable(variabele, variabeletype, string waarde, commentaar)
Hiermee schrijf je andere variabelen
naar de database, zoals je parameters, berekende waarden, computernaam,
enzovoorts
Voor het variabeletype kies je tussen
enum
TYPE_EN{APP_PAR, APP_CHAR,
SYSTEM_PAR, SYSTEM_CHAR, APP_MEASUREMENT, SYSTEM_MEASUREMENT, RESULT}
Maar dit is momenteel totaal onbelangrijk.
Let wel op: eenmaal een variabele gedefinieerd, kan je zijn
signatuur (zie methode header) niet meer veranderen
General Experiment
recording (see EPDAExpRecorder.h)
Create an EPDAExpRecorder object for
each experiment you want to
register into the database.
Experiments are grouped per user, then per project (optional), per
application and finally you can set the application version.
Constructor
EPDAExpRecorder(const string&
application, const string& project, const string&
appVersion="", const string& expComment = "");
Your linux account is taken as the user/owner of the experiment.
Application and experiment comment is only informative.
Parameter
values
EPDA supports 3 types of parameters: integers, doubles and strings.
void
SetExperimentVariable(string name, TYPE_EN type, int value, const
string& unit="", const string& comment = "", int exponent=0);
void
SetExperimentVariable(string name, TYPE_EN type, double value, const
string& unit="", const string& comment = "", int exponent=0);
void
SetExperimentVariable(string name, TYPE_EN type, string value, const
string& comment = "", int exponent=0);
Specify the exponent if you scaled your data with 10exponent
(as integers are limited +-231).
Choose the parameter type:
enum TYPE_EN{APP_PAR, APP_CHAR,
SYSTEM_PAR, SYSTEM_CHAR, APP_MEASUREMENT, SYSTEM_MEASUREMENT, RESULT}
If the variable was already added to the database, the type, unit and
exponent should be the exactly the same. (We envisage to make it
possible to change a variable in the future)
Destructor
The experiment is written to the database by the destructor and prints
a message. Each application (determined by
user-project-application-version) gets a unique ID, and also each
experiment of an application gets a sequential number.
Include mysql (database) and epda in the projectfile as follow:
INCLUDEPATH
=
/usr/include/mysql
$(PARDIR)/include
LIBS
= -L/usr/lib/mysql
-L$(PARDIR)/lib -lepda -lmysqlclient
Opmerking:
deze nieuwe tool is ongoing work en bevat dus nog niet-werkende
features en bugs. De bekende bugs ben ik er nu aan het uithalen. Indien
jullie er nog een tegen komen,
mail
ze me (hoe ik ze kan reproduceren + jullie account). Bedankt voor
het begrip.
|
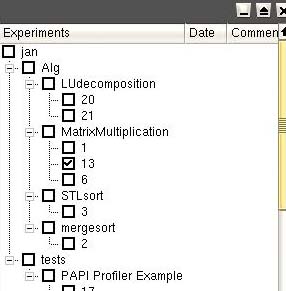
When you start EPDA, you get a
window showing your experiments:
The experiments are grouped per project, application name and
application ID.
By doubleclicking on the application ID, all experiments are showed.
By clicking on an experiment, it's properties are shown in the
properties window.
With the delete button all selected experiments are deleted.
|

|

|
The first time you use EPDA, a
new model should be created.
A model consists of all variables of the database, also variables that
other users created. You can remove these nodes from your model with
the delete button.
The next time you start EPDA, your latest model is loaded automatically.
|

|

|
Load or reload the experimental
data by
selecting the experiments in the experiments window.
Currently,
loading individual experiments goes wrong, select applications or
versions (by ID).
It is possible to select experiments by the values of the nodes: set
the value, the minimum or
the maximum values in the property window of a node.
|
|

|
View the data by creating a new
chart window.
Click on the nodes that has to be displayed as the x-axis and y-axis.
It is possible to add other variables on the Y-axis or to view a 3D
chart, by choosing a Z variable.
|

|

|
Delete all currently loaded
experiments.
|
|

|
Write the currently loaded
experiments to a file.
You can select the variables and the format. The free format is ok for
loading the data into Excel or another analyzer.
|
|

|
You can create derived
variables, which are calculated from other variables by an equation.
Choose the equation type and set a name in the properties panel at the
left. Connect  the output (right
connector) with the input (left connector) of the
equation node. The so calculated values can also be written to file. the output (right
connector) with the input (left connector) of the
equation node. The so calculated values can also be written to file.
|

|

|
Save your model.
|
|
|
|
|
- Back to
the top
-


 the output (right
connector) with the input (left connector) of the
equation node. The so calculated values can also be written to file.
